Banner Credit: Declan Clark
Design 1050: CAD 1 (Fusion 360)
Prerequisite: Design 1020 - The Design Process
Outcomes:
1. demonstrate basic knowledge and skills required to operate CAD software
1.1 explain the purpose and advantages of CAD software; e.g., design, revision, duplication
1.2 identify and demonstrate appropriate use of software and hardware
1.3 effectively manage files and folders according to industry standards
2. use CAD tools to create 2-D drawings while demonstrating basic skills
2.1 drawing space setup; e.g., toolbar, preferences, units, scale, layers
2.2 drawing, modify and assist tools; e.g., line types, trim, rotate, offset, inserting blocks
2.3 dimensioning and notation; e.g., linear and aligned, radius, diameter, circumference, text
2.4 output; e.g., print, plot, layout space, images
3. produce and present one or more portfolio-ready drawings
3.1 present drawing(s) for assessment
3.2 maintain a design folder that illustrates skill building
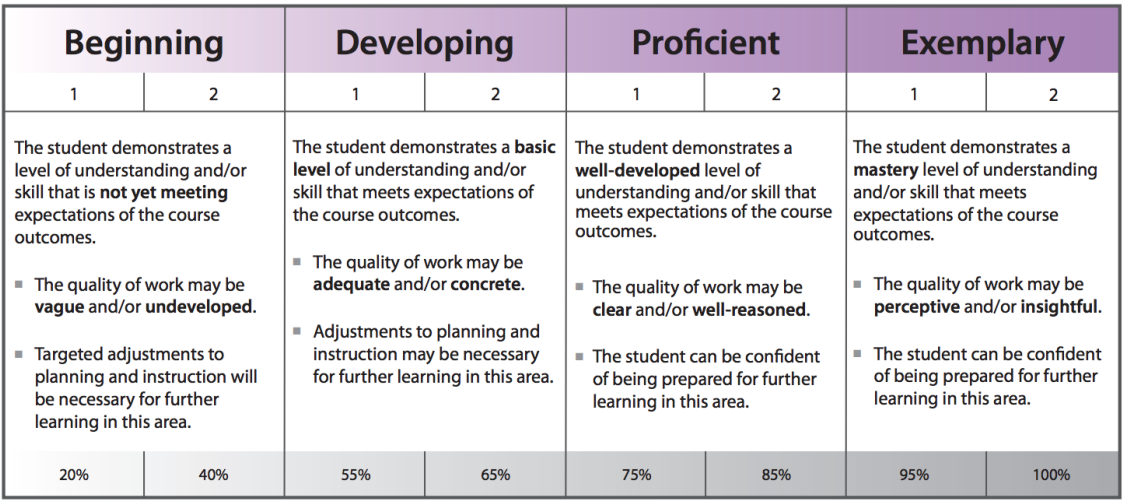
High School Assessment Rubric:
Fusion 360: Engineering Software
Okay, now things get real. This software is capable of building literally anything. It is the evolution of Tinkercad.
Your teacher will have you hooked up with a login, and the invite should be in your school educbe.ca email.
Once you are loggin in with an account you should be able to start using these videos to start to know your way around.
https://help.autodesk.com/view/fusion360/ENU/courses/AP-GET-STARTED-OVERVIEW
Assignment 1: Toy Building Block Core Practice
Now that we have got a bit of experience, I would like us to take it a bit further. This tutorial is great to generate some really good habits in fusion 360.
https://www.youtube.com/watch?v=d3qGQ2utl2A&ab_channel=ProductDesignOnline
https://www.youtube.com/watch?v=d3qGQ2utl2A&ab_channel=ProductDesignOnline
|
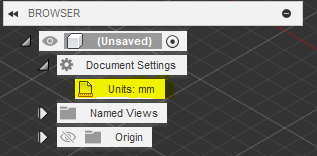
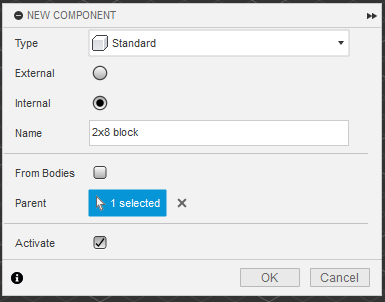
Step 1:Clarify your units here (units become more important as we get more precise) Also, make a new component under the assemble menu.
|
|
|
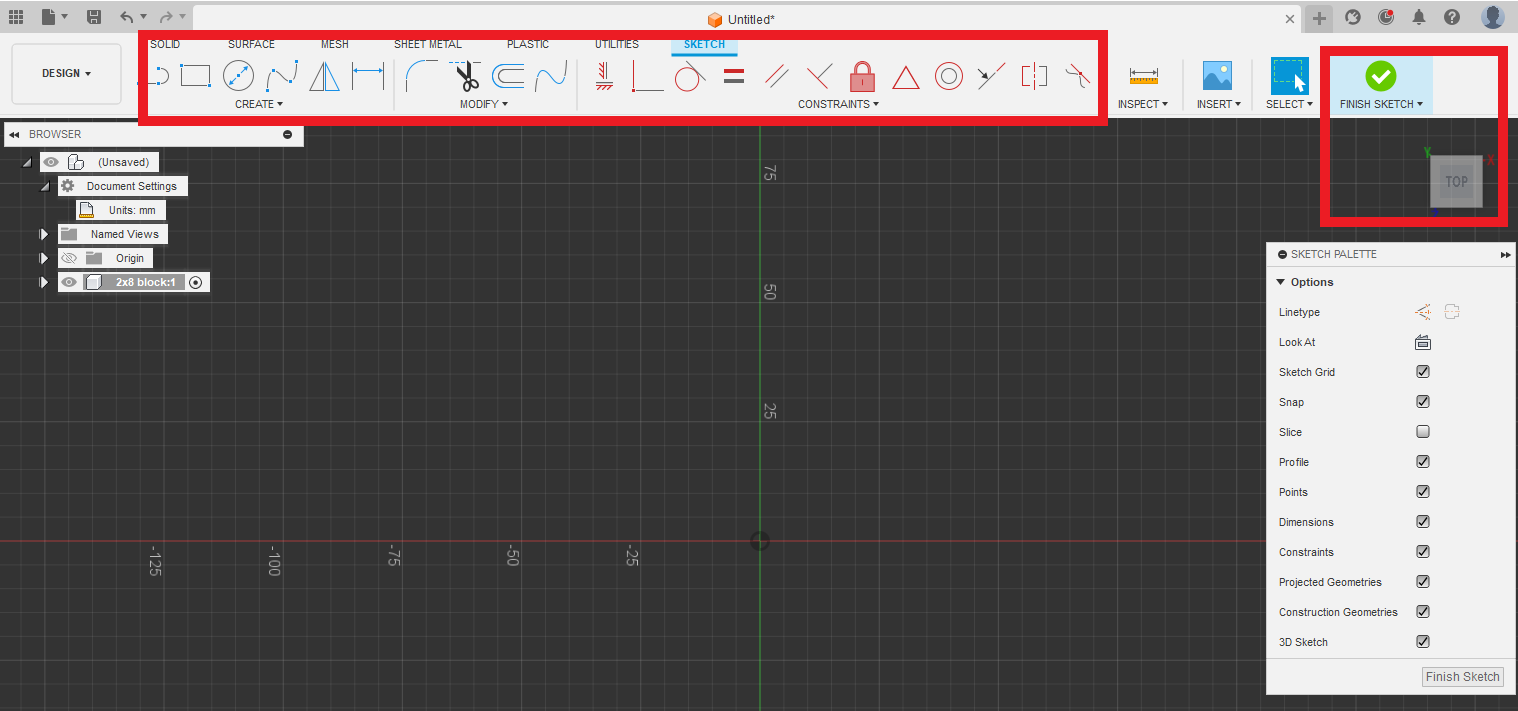
Step 2: Lets start with another "create sketch". Select the planar face where you are going to draw. X,Y, or Z. X is length, Y is width, and Z is height. Watch how the block twists as you select a face. Remember ctrl Z is always your friend in these programs if you mess something up and need to undo it. If I hit the bottom planar face, my block will twist to an above view, this is what we want to start.
|
|
|
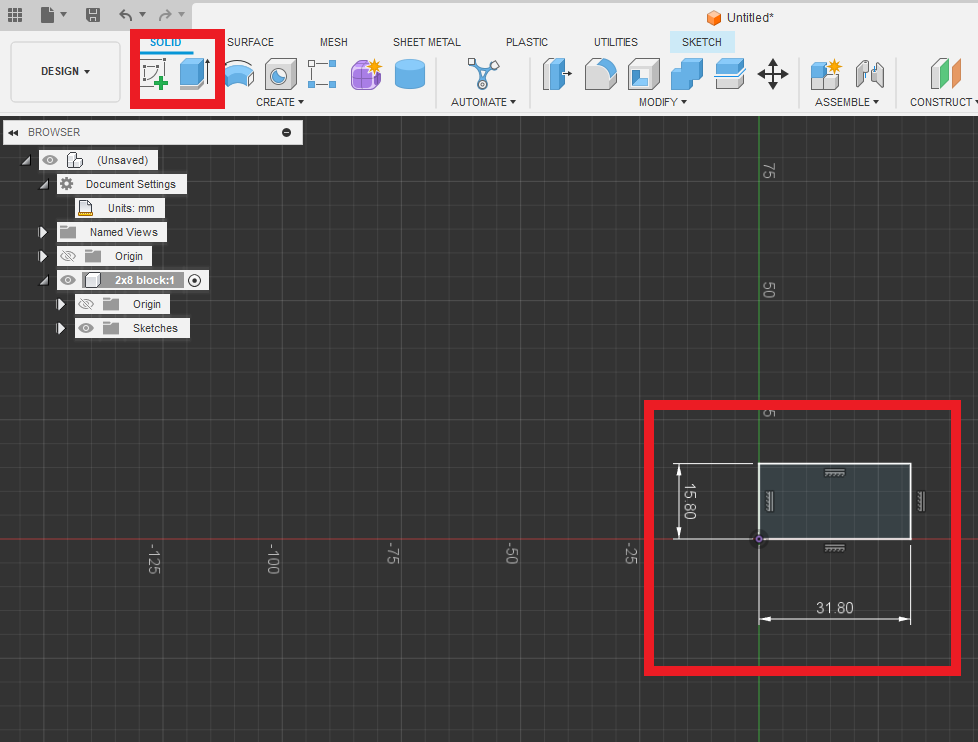
Step 3: Make a 2 point rectangle with a width of 15.8 mm and a length of 31.8 mm for the length. Using the TAB key will allow you to input the dimensions exactly. We are then going to extrude to 9.6 mm. Using the extrude command under the "solid" menu.
|
|
|
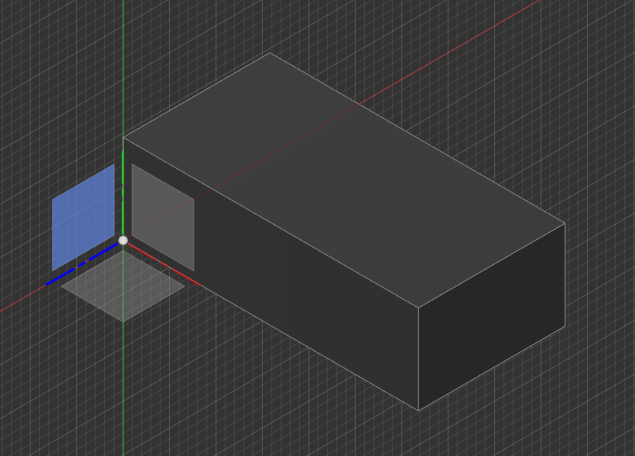
Step 4: After it is extruded, we are going to select another sketch, but instead of a planar face, we will select the top of the lego block. And instead of rectangles, we are going to use the center diameter circle.
|
|
|
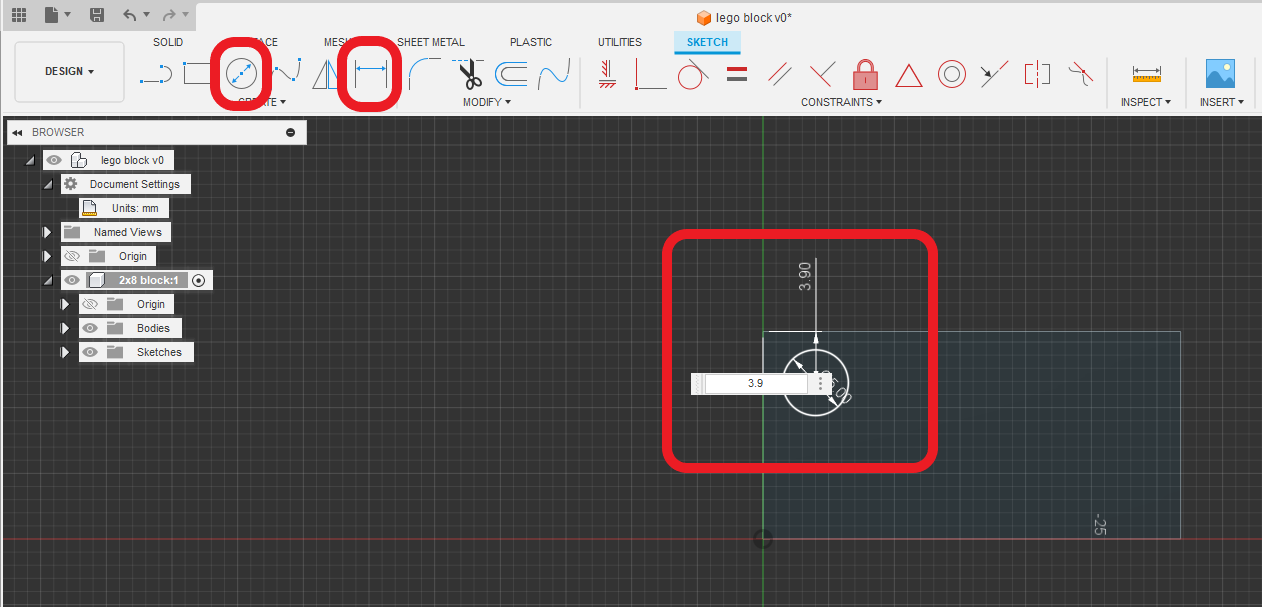
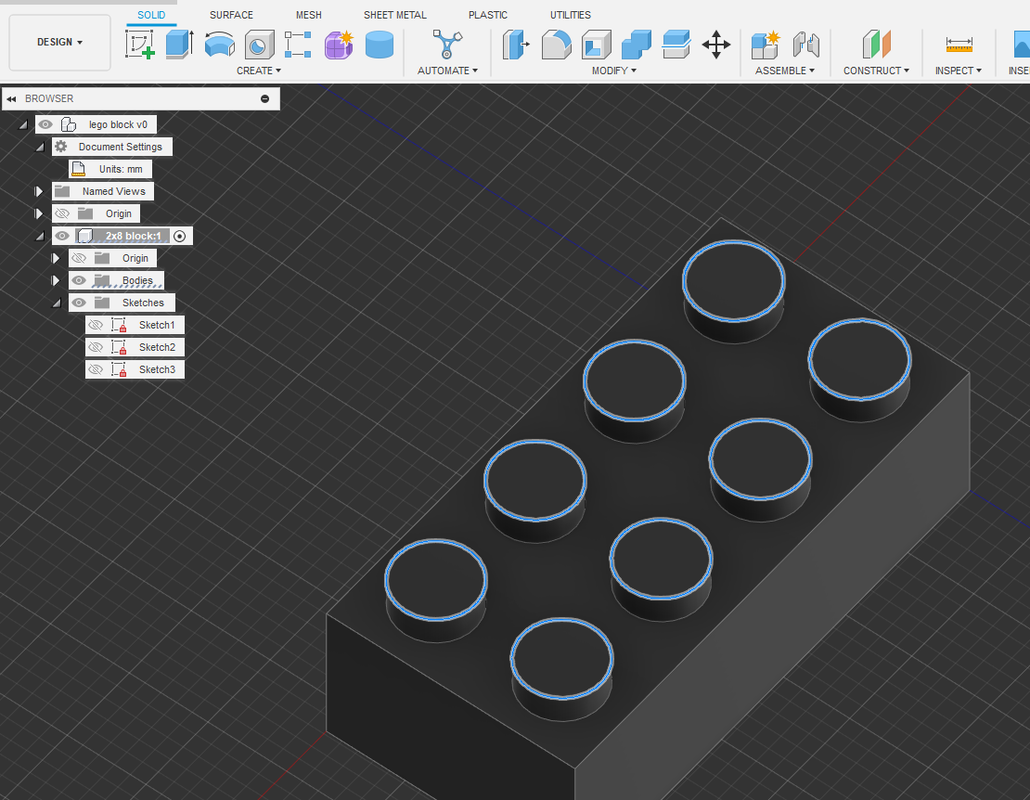
Step 5: use the center dimension circle and make a 5 mm circle anywhere on the block (probably closer to the top left corner is easier). Then use the sketch dimension tool to click the center of the circle and the top edge of the rectangle and make the space between the center of the circle and the edge 3.9 mm. (as shown) Do this for both edges, top and side.
|
|
|
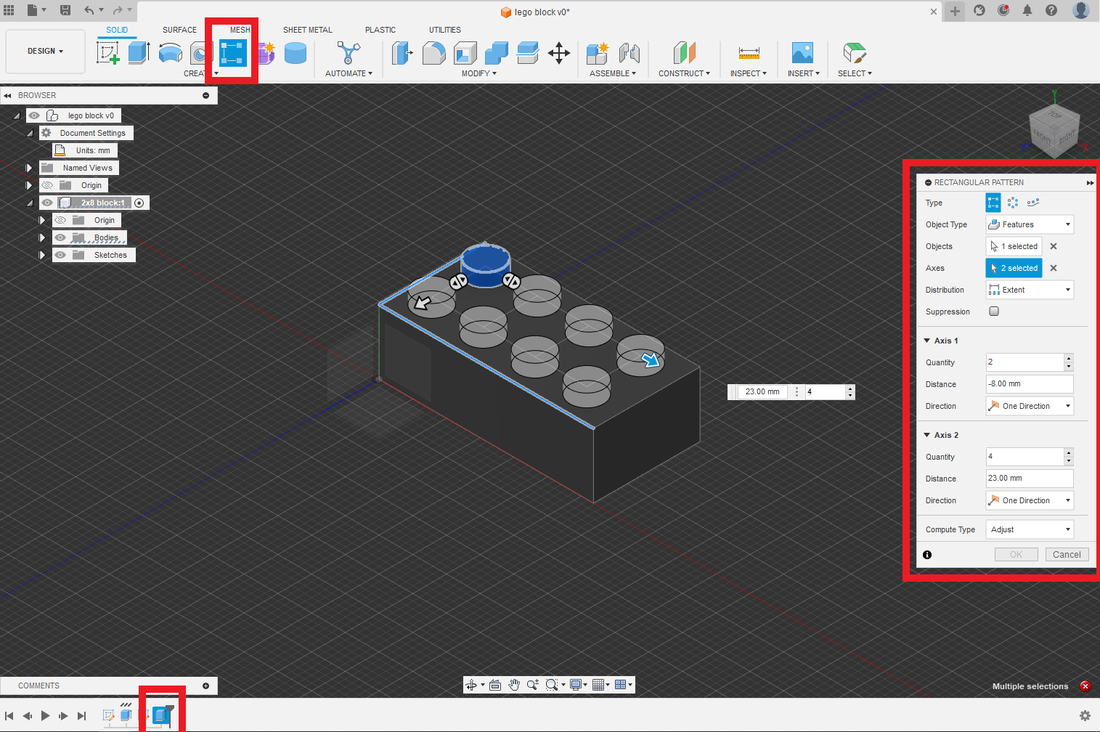
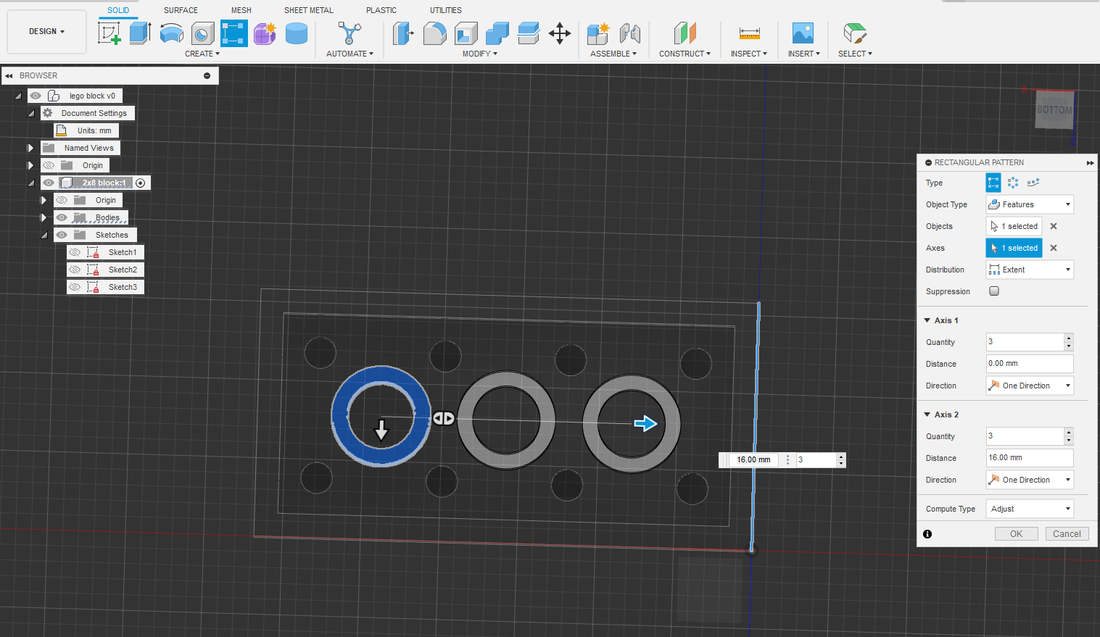
Step 6: Lets extrude the circle by 1.9 mm. Once we get one nub extruded we can select it in the timeline and then putt eh nub to make a pattern. Notice the properties box on the right and mimic mine. I.e. Object type: features, then axis 1 quantity: 2, axis 2 quantity: 4. Drag until its correct.
|
|
|
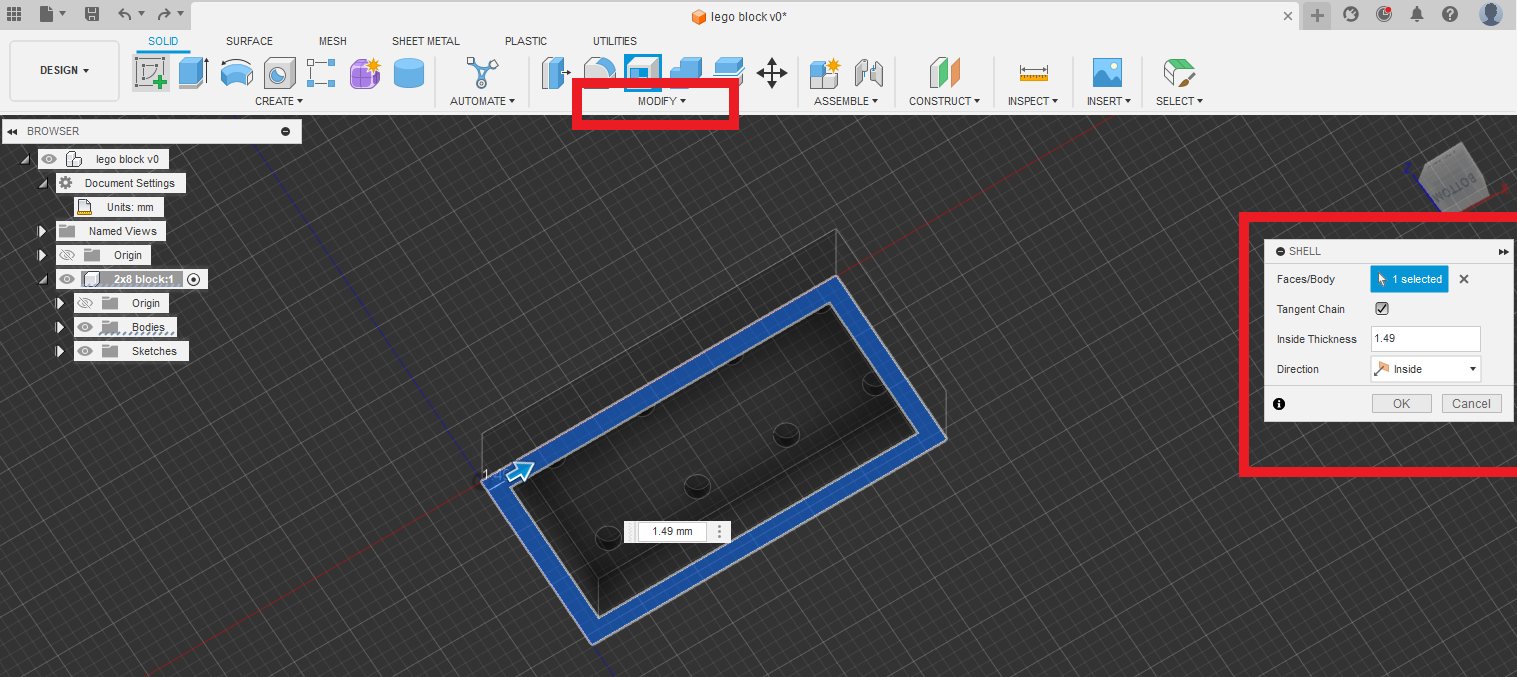
Step 7: Lets hollow out our block with the shell command. Click the bottom face of the rectangle then shell under the "modify" menu. We want a wall thickness of 1.49 mm.
|
|
|
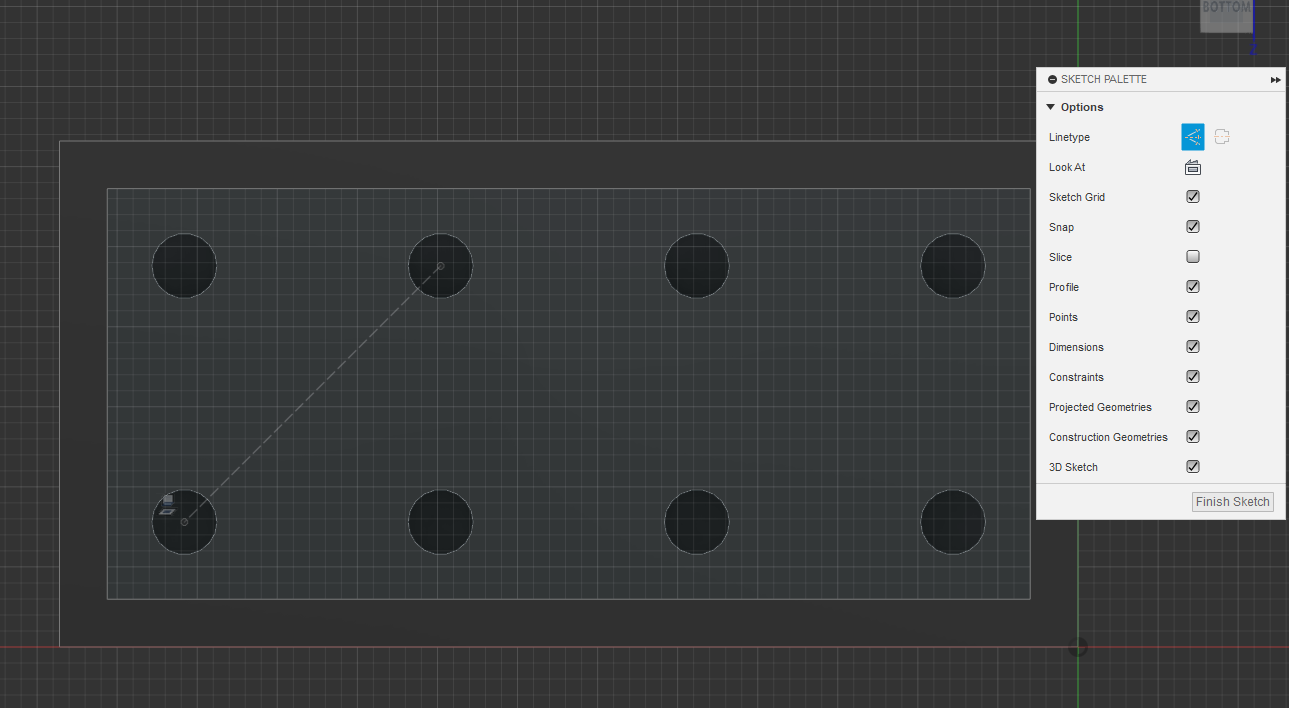
Step 8: Things get a little tricky here. We are going to draw a fake line using the sketch tool and clicking "linetype, construction" in the properties tab between the two circles. You will need to choose the bottom face where the nubs are to create you sketch. Then trace a diagonal line between the two. Make sure your linetype is construction to not have your line affect anything.
Now we have reference to make a center circumference circle. |
|
|
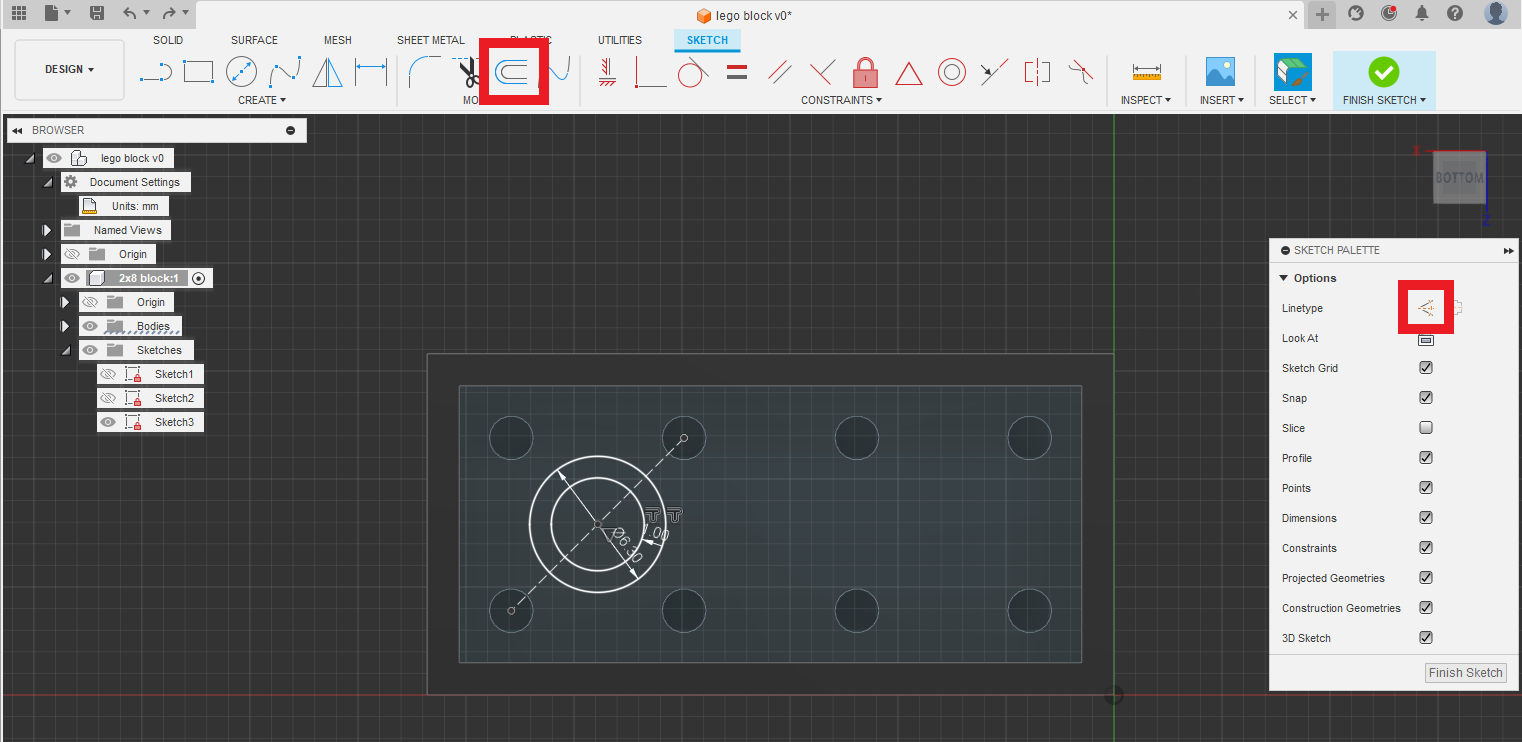
Step 9: Choose the circle sketch and hover over the line until you see a triangle. This is the center of your line and the center of your circle. Your circle diameter is 6.3 mm. Make sure you unclick construction so your circle is "real". Select the circle and use the offset command to make another circle. Use 1mm as the offset distance. You can use the flip button in the properties to change the offset circle into the center. We can go ahead and extrude it now to the bottom at 8.1 mm.
|
|
|
Step 10: Lastly fillet your nubs at .2 mm. Hold shift while selecting the tops and use the fillet tool.
|
|
Assignment 2: Chess Piece / Soda Bottle
There is a great video here for those of you who want to take the extra step in your fusion 360 journey. It is a bottle instead of a chess piece. Both are accepted, but there is a higher degree of difficulty for the bottle, and as such will be graded higher upon completion.
https://www.youtube.com/watch?v=DfAfxae8aRc&ab_channel=ProductDesignOnline
https://www.youtube.com/watch?v=DfAfxae8aRc&ab_channel=ProductDesignOnline
|
Step 1: Find a picture of a chess piece you want to create in 360
|

|
|
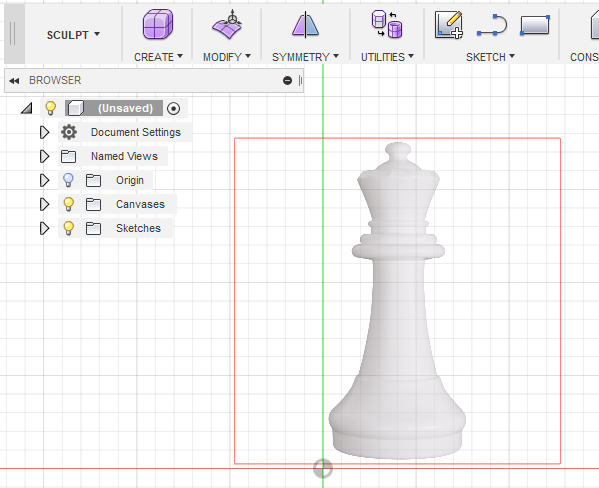
Step 2: Import the picture into 360 using the INSERT CANVAS command. Select the z (up and down) plane to make the piece stand upright. Enter the sculpting mode in the top left hand corner of the menu bar at the top.
IMPORTANT! Pay attention to the scale of your model. I won't be printing any 700 ft chess pieces. |
|
|
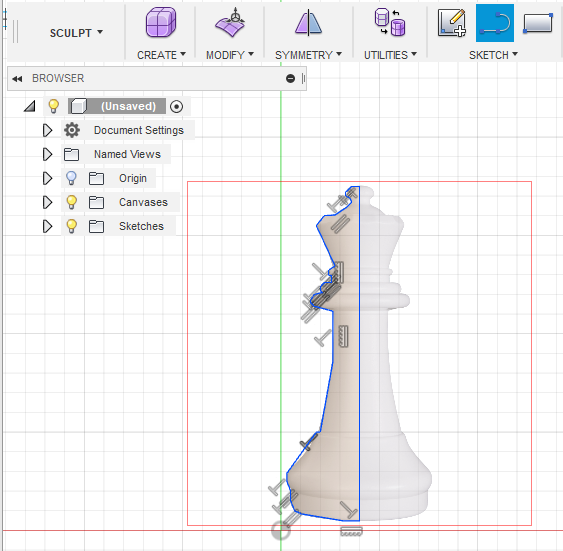
Step 3: Create an 1/2 outline of your piece using the SKETCH tool.
|
|
|
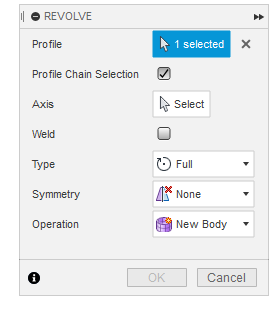
Step 4: Under the CREATE menu select REVOLVE and choose the profile of the piece that you have sketched in. Then in the REVOLVE menu on the right, click on the AXIS menu and choose the middle line of your piece.
|
|
|
|
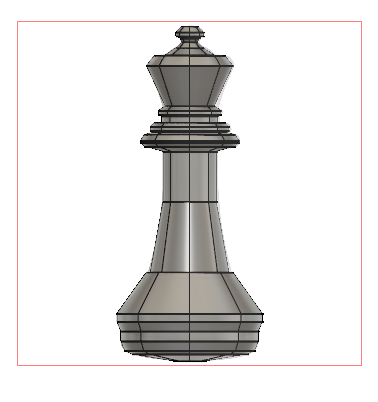
Step 5: BAM! You should have your own sculpted chess piece. Make your design ready for print, fix any problems via the design process etc. Export to stl. etc etc
|
|
Assignment 3: Dice
Your first task is design a 6 sided die. This will get you working with guides to make things proportional.
|
Step 1: Draw a sketch the size of your die. 20 cm x 20 cm is decent to start. You can make it bigger if you like, but not too big. Extrude it to make a square box.
|

|
|
Step 2: Use the fillet tool to round the edges to make the dice roll smooth.
|
|
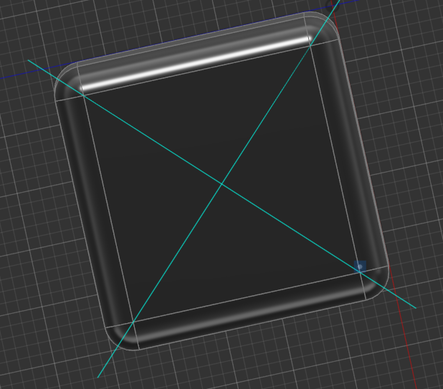
Step 3: This is where things get a little tricky. We are going to work with the construction menu. Mainly two tools, axis across two points and point along path. Depending on where your dots (numbers are on your die) are you will use axes to find the correct position. Here is the example for one:
Now you have a reference to sink your hole. Which you should know how to do by now. |
|
|
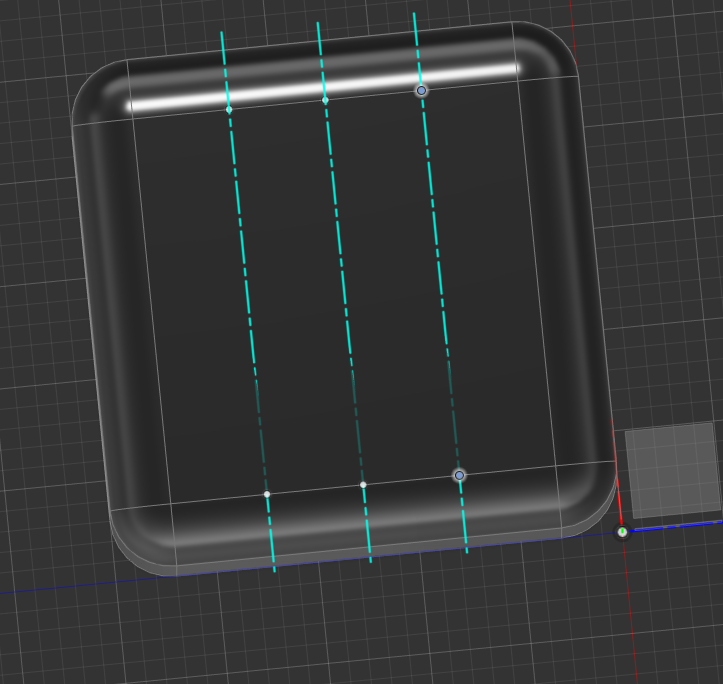
Step 4: Use the point along path to make points to cross your axes across. I put mine at 25%, 50% and 75% for proportions. Here is an example for 6.
Sink the holes at exactly where the lines intersect. Make the holes uniform. Research your dice to make sure your numbers are on the correct sides. |
|
Assignment 4: Paper Clip Sweep Command
Here is the video, I will make the tutorial to come.
https://www.youtube.com/watch?v=ZReXmjT42DM&ab_channel=ProductDesignOnline
https://www.youtube.com/watch?v=ZReXmjT42DM&ab_channel=ProductDesignOnline
