Communication Technology 1205: Introduction to Photography
Outcomes:
1. describe the role of photography in society; e.g., art, social statement, entertainment, historical record, illustrating ideas and concepts, scientific research, exploration
2. use various photographic equipment, image-capture devices, materials and processes to demonstrate basic photographic skills
2.1 identify and describe the key components and functions of a camera
2.2 classify different types of image-capture devices and some of their potential applications
2.3 explain the rule of thirds as it applies to photographic composition and framing
2.4 identify the light sources and their roles in manipulating mood, given a set of photographs/images
2.5 explain the concept of focus in photography and differentiate between those photographs that are in focus and those that are out of focus
2.6 explain the notion of depth of field in photography and differentiate between those photographs that have a long depth of field and those that have a shallow depth of field
2.7 use correct terminology in the context of photographic work and during presentations
2.8 load and unload photographic film and/or storage media from a camera
2.9 differentiate between a snap shot and a planned photograph by:
2.9.1 framing for composition
2.9.2 focal point
2.9.3 camera placement; e.g., not a view of the top of the dog’s back—get down to subject level
2.9.4 choosing vertical or horizontal format—changing camera direction
2.9.5 being aware of the background; e.g., not having a tree appear to be growing out of the subject’s head
2.9.6 dynamic range
2.9.7 field of view
2.9.8 depth of field
2.9.9 using a camera/image-capture device to capture and log aperture and shutter for least 24 images
2.9.10 demonstrating an understanding of shutter speeds and aperture, basic composition (e.g., balance, line, perspective, rule of thirds, repetition), lighting (e.g., natural, artificial)
3. describe and/or use various processing methods; e.g., black and white, colour, digital
3.1 process images and print or display at least six images in proofing and in final format
3.2 process photographs to produce prints, images or displays
3.3 identify and demonstrate darkroom safety precautions and protocol (if applicable)
4. choose the proper International Standards Organization (ISO) light sensitivity/film speed and/or resolution setting, file format and image capture (camera) settings for good image capture; e.g., 64, 100, 160, 200, 400, 640, 800, 1600, raw, jpeg
4.1 explain what the International Standards Organization (ISO) system refers to when adjusting the ISO setting on film and/or digital type cameras; e.g., sensitivity to light by the film or digital sensor resulting in either film grain or digital noise
4.2 capture images using an image-capture device/camera, considering:
4.2.1 each image to be in focus
4.2.2 basic composition guideline: the rule of thirds
4.2.3 clear focal point
4.3 create photographic images that generate curiosity and discussion
5. present a selection of work completed in this course to an audience
5.1 discuss each photograph regarding:
5.1.1 how the composition guidelines help facilitate good arrangement in his or her work
5.1.2 the technical and creative aspects of the work; e.g., quality, focus, interest, writing
5.1.3 areas of challenge/difficulty (if applicable)
5.1.4 meeting school and community standards; e.g., appropriate language
5.1.5 the use of tools and equipment
5.2 participate in peer/teacher assessment
5.3 add the selected work to a portfolio
The Basics
Straps:
ALWAYS keep your strap on and secured to your body. There are multiple ways to carry a camera, but my favorite method is to have the strap around my shoulder with the camera pointed down. Not only does this take a lot of weight off my neck, but it also keeps the camera lens safe and not sticking out from my side.
Protect the Lens:
As you develop your skills, you will realize that lenses are actually the most valuable and important part of your camera set-up. Protecting this lens is of the utmost importance, (Mr. MacLean) will not be pleased if any of the lenses are damaged), so make sure you follow these simple rules.
Do not look at every picture:
Okay, so your camera is all set and its time to take a picture. You will no doubt notice a strong urge to look at every shot the second you take it… resist this urge! Yes, it is fine to look at shots now and again to make sure your settings are good, focus is fine, exposures are correct, but you really don’t need to look at EVERY. SINGLE. SHOT. Instead, immerse yourself in your environment and the surrounding action. Good photographers see what other people miss, and you wont be able to see these details if you’re staring at your camera.
ALWAYS keep your strap on and secured to your body. There are multiple ways to carry a camera, but my favorite method is to have the strap around my shoulder with the camera pointed down. Not only does this take a lot of weight off my neck, but it also keeps the camera lens safe and not sticking out from my side.
Protect the Lens:
As you develop your skills, you will realize that lenses are actually the most valuable and important part of your camera set-up. Protecting this lens is of the utmost importance, (Mr. MacLean) will not be pleased if any of the lenses are damaged), so make sure you follow these simple rules.
- If the camera is not around your neck shooting, make sure the lens cap is on.
- Always store the camera with the lens cap on
- I recommend using a lens hood as it provides a bit of extra protection
Do not look at every picture:
Okay, so your camera is all set and its time to take a picture. You will no doubt notice a strong urge to look at every shot the second you take it… resist this urge! Yes, it is fine to look at shots now and again to make sure your settings are good, focus is fine, exposures are correct, but you really don’t need to look at EVERY. SINGLE. SHOT. Instead, immerse yourself in your environment and the surrounding action. Good photographers see what other people miss, and you wont be able to see these details if you’re staring at your camera.

Auto focus:
Auto focus has improved dramatically over the past several years and as such I highly recommend that you use AF in most of your camera work. There are 3 main types of auto focus and it is important to understand how each of them work. No one mode is necessarily better than the other, but each mode has its own ideal situation.
https://www.youtube.com/watch?v=f4SheORyrbI
Auto focus has improved dramatically over the past several years and as such I highly recommend that you use AF in most of your camera work. There are 3 main types of auto focus and it is important to understand how each of them work. No one mode is necessarily better than the other, but each mode has its own ideal situation.
- One Shot – Ideal if your subject is NOT moving. Each time you push down the shutter button half way, they camera will focus and lock on your subject.
- AI Focus – You know your subject will be moving, (Soccer player running, dogs at a dog park, etc) and you want to have the camera change its focus while shutter button is half pushed down
- AI Servo – Camera will refocus on whatever subject is behind your Autofocus point.
https://www.youtube.com/watch?v=f4SheORyrbI
Assignment 1: Shutter Speed
Let me attempt to break down the topic of “Shutter Speed” into some bite sized pieces that should help digital camera owners trying to get their head around shutter speed:
- Shutter speed is measured in seconds – or in most cases fractions of seconds. The bigger the denominator the faster the speed (ie 1/1000 is much faster than 1/30).
- In most cases you’ll probably be using shutter speeds of 1/60th of a second or faster. This is because anything slower than this is very difficult to use without getting camera shake. Camera shake is when your camera is moving while the shutter is open and results in blur in your photos.
- If you’re using a slow shutter speed (anything slower than 1/60) you will need to either use a tripod or some type of image stabilization (more and more cameras are coming with this built in).
- Shutter speeds available to you on your camera will usually double (approximately) with each setting. As a result you’ll usually have the options for the following shutter speeds – 1/500, 1/250, 1/125, 1/60, 1/30, 1/15, 1/8 etc. This ‘doubling’ is handy to keep in mind as aperture settings also double the amount of light that is let in – as a result increasing shutter speed by one stop and decreasing aperture by one stop should give you similar exposure levels (but we’ll talk more about this in a future post).
- Some cameras also give you the option for very slow shutter speeds that are not fractions of seconds but are measured in seconds (for example 1 second, 10 seconds, 30 seconds etc). These are used in very low light situations, when you’re going after special effects and/or when you’re trying to capture a lot of movement in a shot. Some cameras also give you the option to shoot in ‘B’ (or ‘Bulb’) mode. Bulb mode lets you keep the shutter open for as long as you hold it down.
- When considering what shutter speed to use in an image you should always ask yourself whether anything in your scene is moving and how you’d like to capture that movement. If there is movement in your scene you have the choice of either freezing the movement (so it looks still) or letting the moving object intentionally blur (giving it a sense of movement).
- To freeze movement in an image you’ll want to choose a faster shutter speed and to let the movement blur you’ll want to choose a slower shutter speed. The actual speeds you should choose will vary depending upon the speed of the subject in your shot and how much you want it to be blurred
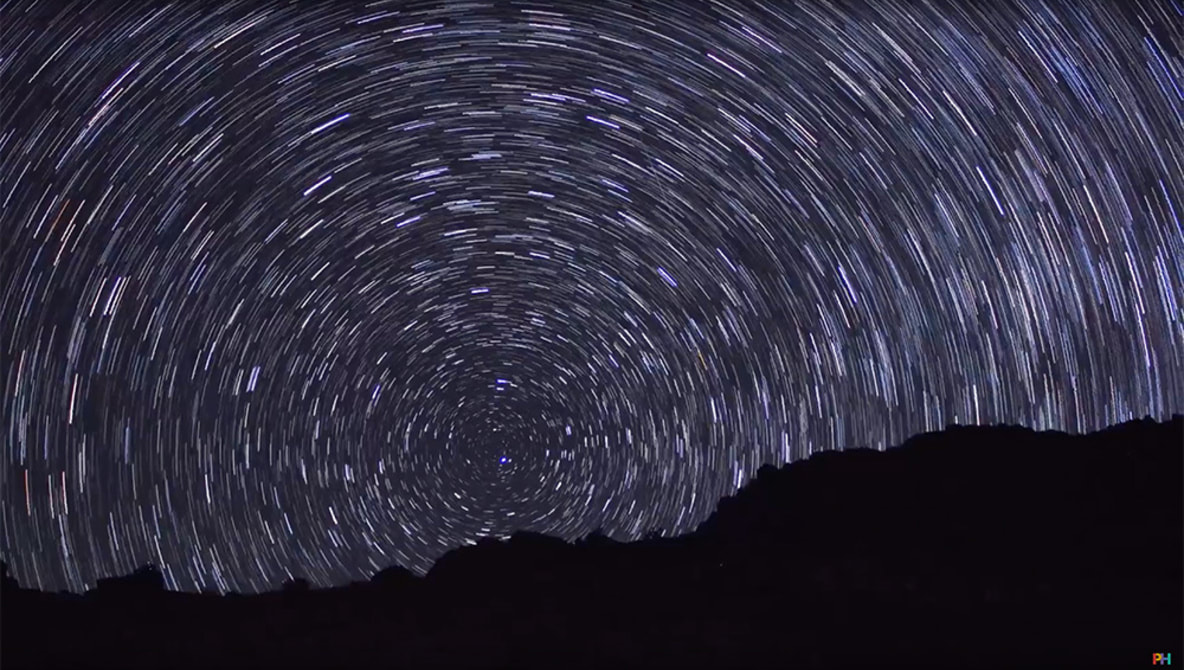
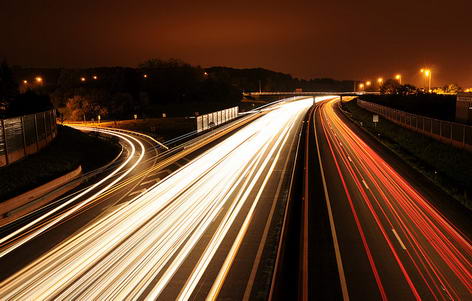
- Motion is not always bad. I spoke to one digital camera owner last week who told me that he always used fast shutter speeds and couldn’t understand why anyone would want motion in their images. There are times when motion is good. For example when you’re taking a photo of a waterfall and want to show how fast the water is flowing, or when you’re taking a shot of a racing car and want to give it a feeling of speed, or when you’re taking a shot of a star scape and want to show how the stars move over a longer period of time. In all of these instances choosing a longer shutter speed will be the way to go. However in all of these cases you need to use a tripod or you’ll run the risk of ruining the shots by adding camera movement (a different type of blur than motion blur).
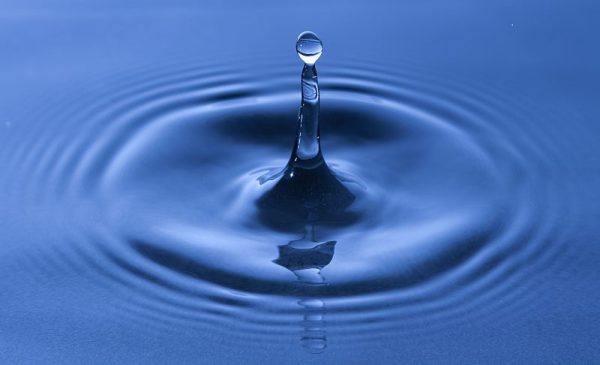
Examples of Fast Shutter Speed:
|

|
Examples of Slow Shutter Speed:
|
|
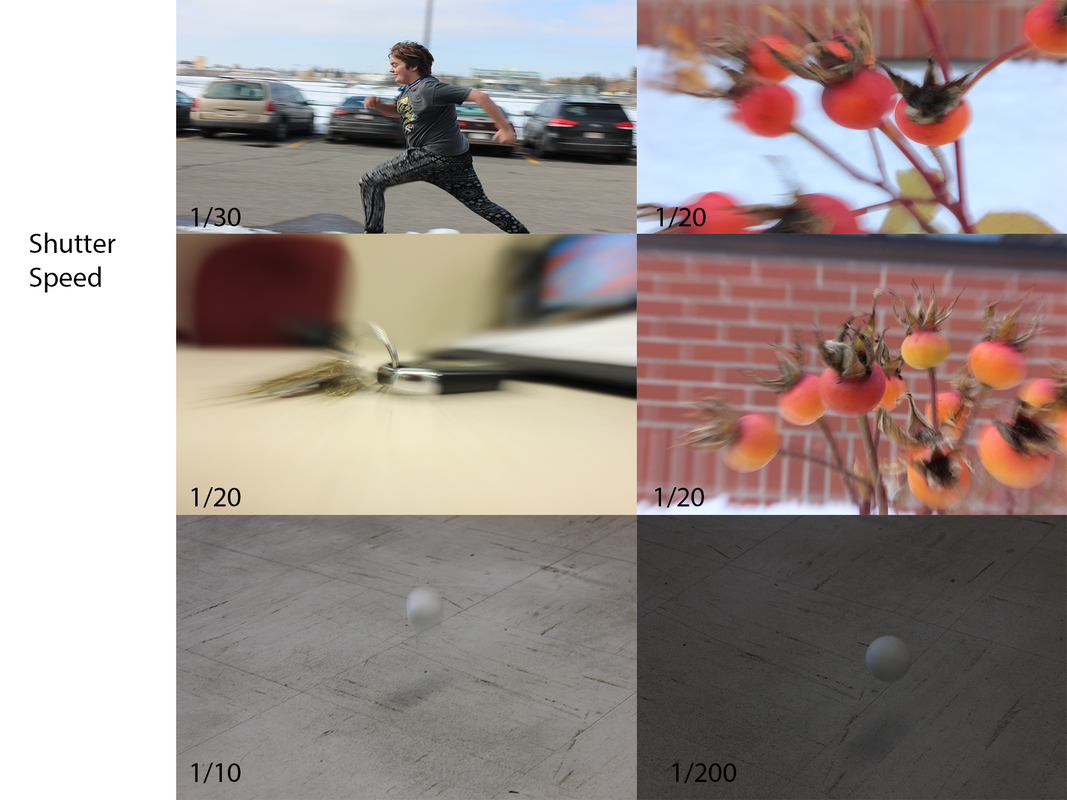
Here is how photographers use Shutter Speed to help tell a story. They may slow SS down to allow for motion, or they may speed SS up to freeze a moving object. If you want light to streak across your picture, try slowing the SS down to something below 1 second. If you are capturing an athlete while they compete in a sporting event, you may want to speed up the SS to capture all the action. There is not right or wrong way to take a photo!!
Complete the following tasks by taking a photo at the correct shutter speed.
Picture 1
With a partner, grab a ball. MacLean usually has a ping pong ball in his desk. Set the camera to Shutter Priority (Tv) so that you only have to worry about your aperature. Have your partner bounce the ball and take a picture of the all while it is moving. Set the SS to something slow, anywhere between 1/10 – 1/40 should work well. Can you get a picture of the moving all suspended without it being blurry?
Picture 2
Now set the shutter speed to something faster (above 1/40) and see if you can capture the motion of the ball. Easier? Did you picture turn out better? Pay attention to light, is the picture getting darker? Why?
Picture 3
Amp the shutter speed way up! See if you can freeze the photo using a fast shutter speed!
**hint** the Shutter should be at least faster than 1/200 and you might need to turn up the iso...
Picture 4
Set the shutter speed to something slow (1/10 – 1/40) and try taking a picture at the exact same time you zoom the camera in or out. You will notice it looks like you’re moving toward or away from your subject
Picture 5
Try a variety of slow shutter speeds (1/10 – 1/40) to create artistic effects on everyday landscape subjects such as trees, rocks and nature trails. Move your camera up or down to create wonderfully blurry and mysterious looking trees. Spin your camera around to create dizzying spirals. Or zoom in while you capture a photograph of a pretty flower or a dog running towards you.
Picture 6
Optional: Try and get a picture of a friend running somewhere. Hopefully not from the cops.
When you have completed all 5 of your photos, arrange them on a photoshop slide and have a text box that lists the shutter speed you used. Here is an example of what you should have in your folder. Title the slide: shutter speed.
Assignment 2: Aperture/Depth of Field
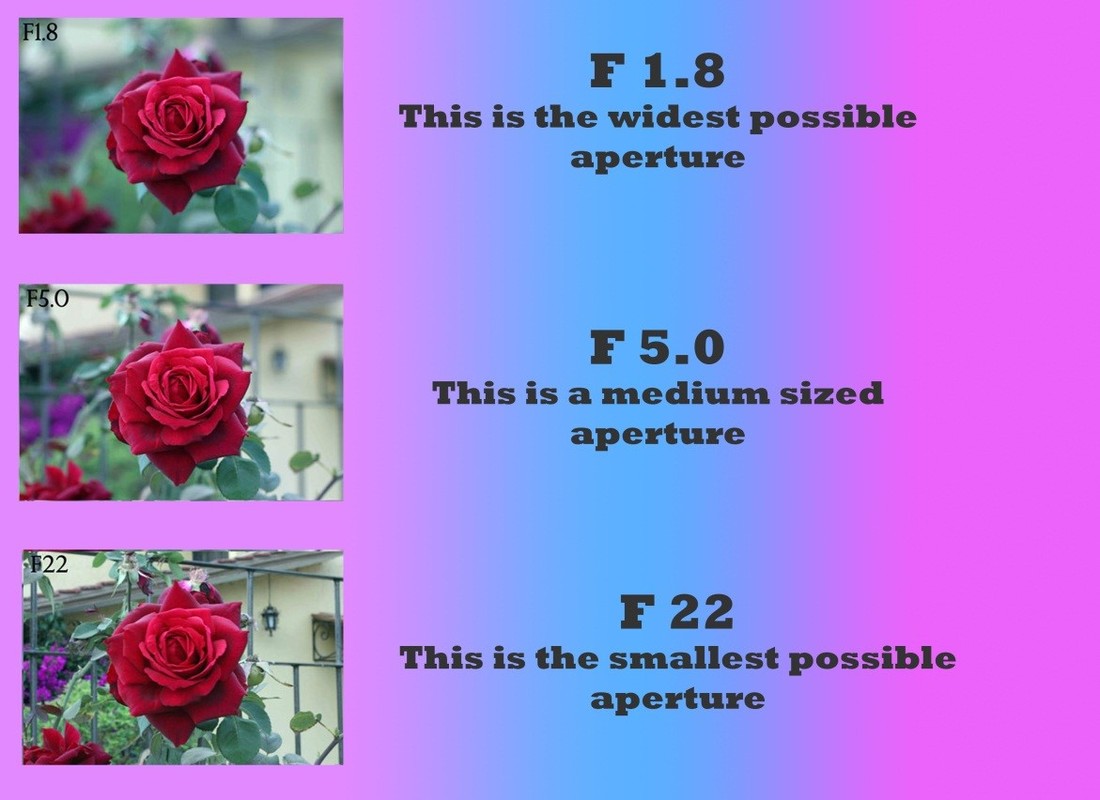
Aperture
The word aperture simply means “an opening”. In the case of photography, the aperture is created by an adjustable iris that can be opened or closed to control how much light enters the camera. This iris is made of a series of thin metal blades that move together to create a roughly circular opening of variable size. In most DSLR cameras, the iris is built into the lens itself. It is the opening in this iris that is actually the aperture.
When adjusting the size of the aperture, we describe “opening” the aperture up and “stopping” it down. That simply refers to making the hole wider or narrower. A photographer may say they are “shooting wide”, meaning they have opened the aperture a lot, or they may say they are “stopped way down”, meaning the aperture has been closed a lot.
Basically, if you have a wide aperture (biggest hole) you will allow the most light to get in. If you make the hole smaller, less light can get in. A wide aperture is one with the smallest F-Stop like 1.4 or 2.0, (I know this is confusing, but just remember, small number = wide hole). So a small aperture is one with a large F-Stop like F22.
Depth of Field
The depth of field is the region of the photo which is in focus when the image is captured. It is a range of distance from the camera where objects look to be in focus. Aperture influences the depth of field by widening or narrowing this range, thus bringing more or less of the photo into focus, based on its distance from the camera.
The larger the hole that the light passes through a pinhole camera, the blurrier the image will be. When a lens is added to the camera, the image can be brought into focus, no matter the size of the hole, however, objects just either side of the focus point will be affected. If the hole, or aperture, is large, only objects very close to the focus point will be in focus. If the aperture is small, then the depth of the focus field is much wider, and more remote objects will be in focus.
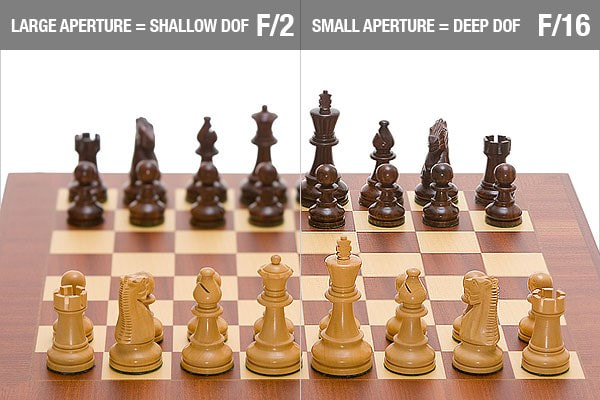
You are going to learn how aperture works to improve your photography skills by taking 3 pictures at different apertures. To do this, you will use the Aperture Priority setting on the camera, (AV), so that the camera automatically sets your Shutter Speed for you.
It should look like this:
- Take 1 photo at the lowest aperture possible (F1.4 – F2.8) and make sure you have your subject in the foreground. You should observer that the background is blurry.
- Now take a second photo at a medium aperture (F7.0) and observe the same background. It should be more in focus.
- Finally, take a third photo at the smallest aperture (F20) and observe the background again. You should see that the whole background is in focus.
It should look like this:
Assignment 3: ISO
What is ISO?
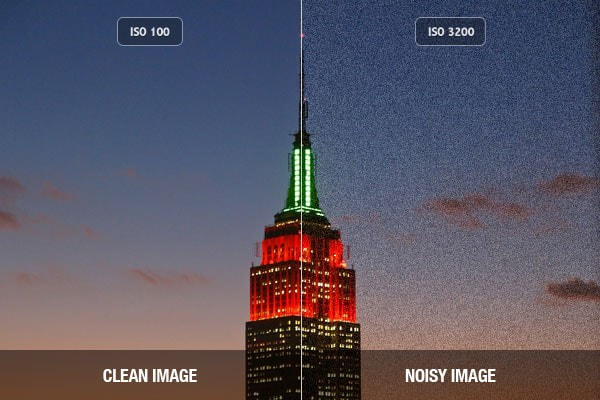
Sometimes we aren’t fortunate enough to be shooting with enough light to be able to ignore the noise. When we need to keep a fast shutter speed, or there’s not enough light even with the aperture wide open, we can increase the ISO setting on the camera. When we do so, we are increasing the signal gain. Essentially this is like turning up the volume. Each doubling of the ISO value, is a doubling of the gain: a doubling of the measured current in the chip.
Doubling the light in your photo is a pretty easy way to make an otherwise under exposed photo bright enough, but it comes at a cost: you lower the signal to noise ratio, and the noise becomes more apparent. Imagine you’re in a candle-lit room, and to take your photo, you have to set your camera to ISO1600 to get a correct exposure. You have now increased the noise value – which at 100ISO would be invisible – sixteen times, resulting in a noisy, grainy mess.
Much can also be done about noise in your photos in the processing stage, but that’s a topic for a later lesson. As always, one should struggle to do the best one can in the camera, before resorting to post-processing to fix problems.
Here is a great video explaining ISO
https://www.youtube.com/watch?v=mB4xLIz27ts
Notice how the same picture gets worse and worse looking as you add more ISO? This is exactly why you only use ISO as a last resort to get the correct exposure.
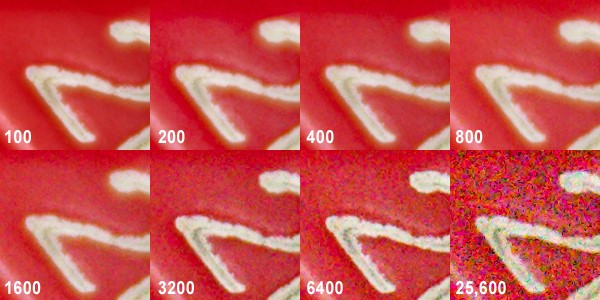
ISO goes up by doubling the light in the photo
100 - ISO is at its lowest setting.
- Highest Quality, Lowest Light Added
- Use if you’re Outside on a sunny day
200
400
800
1600 - Medium Setting. Use if you’re in a dark room or Gym
3200
6400 - This is the highest setting on most DSLR Cameras.
Lowest Quality, Highest Light Added.
(Don’t use this setting)
Assignment
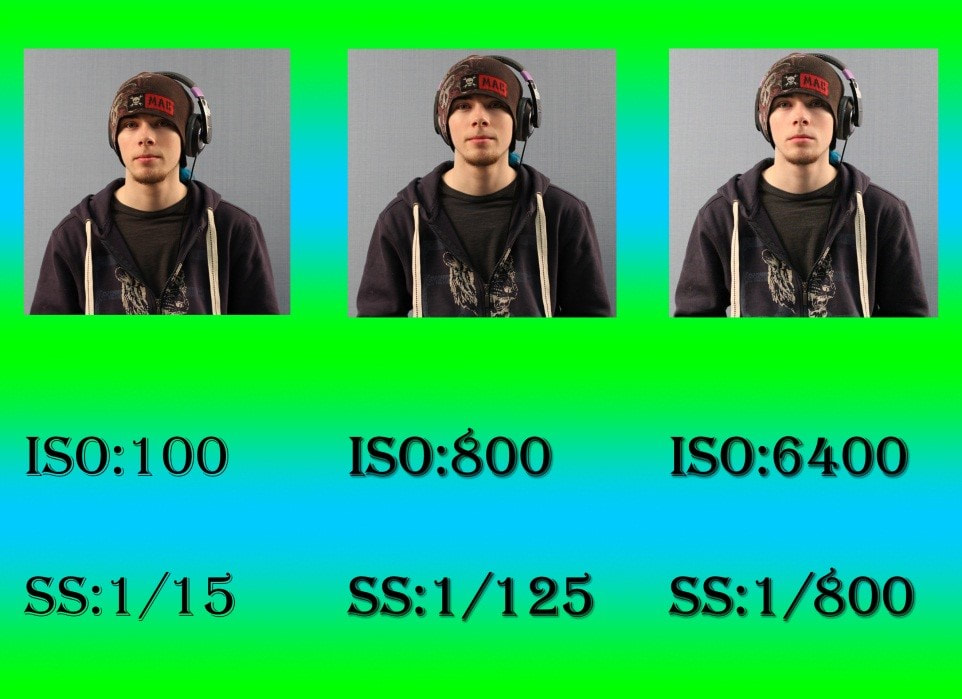
Take 3 photos at different ISO values with a constant aperture of F5.0. The pictures will be taken at ISO 200, ISO 800, ISO 6400. You will have to adjust your Shutter Speed to compensate for the change in light. As you increase the ISO, you will also have to increase your shutter speed. Once you have 3 properly exposed photos you will then have to assemble them on a slide. Be sure to label your slide to include the camera settings you used on that photo. Here is an example of the final product. Please save your slide as a jpeg and put in your iso folder.
Take 3 photos at different ISO values with a constant aperture of F5.0. The pictures will be taken at ISO 200, ISO 800, ISO 6400. You will have to adjust your Shutter Speed to compensate for the change in light. As you increase the ISO, you will also have to increase your shutter speed. Once you have 3 properly exposed photos you will then have to assemble them on a slide. Be sure to label your slide to include the camera settings you used on that photo. Here is an example of the final product. Please save your slide as a jpeg and put in your iso folder.
|

|
Assignment 4: Photography Final Project!
For your final assignment please Google: "iconic photographs". What is returned? What do all of these photographs tell us about photography and its importance to society? Make a PowerPoint presentation of your favorite iconic photographs (minimum 5) and include a short write up discussing the significance (why is it important to photography and world history) of the chosen photos. Once this is complete, please deposit it in you photography folder. You should now have 3 Photoshop slides (shutter speed, aperture, iso) and 1 PowerPoint.
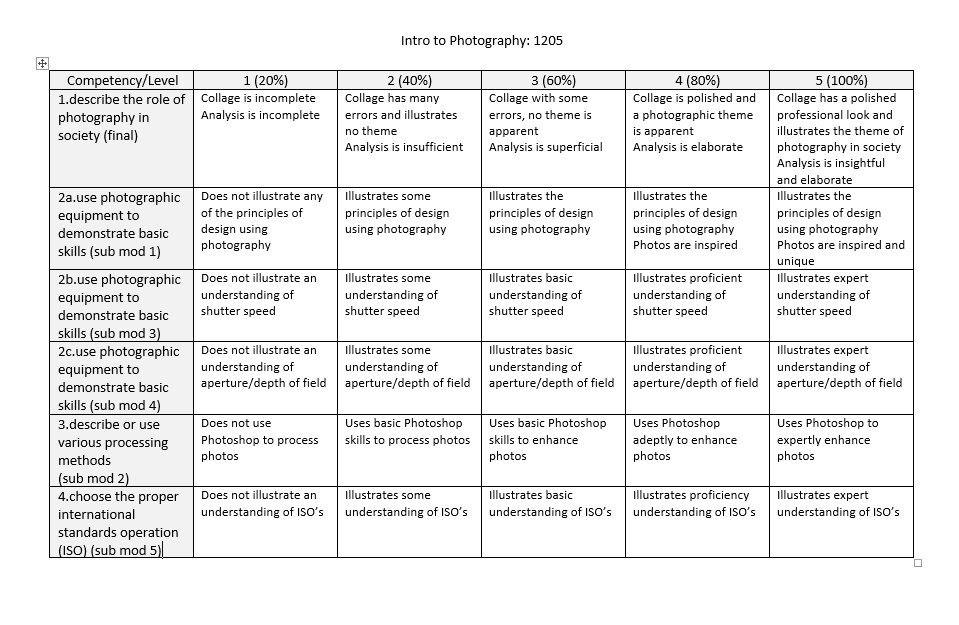
You will be evaluated on the following rubric: