Banner Credit: Elvis Nguyen
Communication Technology 2145: Animation 2
Prerequisite: Comm Tech 1145 - Animation 1
Outcomes:
1. demonstrate knowledge of various animation styles, techniques, applications and terminology
1.1 identify and provide examples of applications of animation that use storytelling to convey their message; e.g., cartoons, film, advertising
1.2 identify and describe the evolution of traditional and digital animation styles and techniques;
1.3 identify and describe principles of animation; e.g., personification, exaggeration, secondary action, anticipation, stretch/squash
2. produce an animation that develops an idea and tells a story; e.g., establishes a theme, evokes an emotional response
2.1 prepare a proposal and storyboard; e.g., description of the images or scenes to be animated, description of the story or idea
2.2 select an animation technique to produce a project
2.3 demonstrate a variety of animation production elements; e.g., visuals or models, backgrounds and/or sets as required, movement
3. identify copyright restrictions and permissions and put them into practice
4. present a selection of work completed in this course to an audience
4.1 discuss work regarding:
4.1.1 how the elements and principles of design help facilitate good composition in his or her work
4.1.2 the technical and creative aspects of the work; e.g., quality, animation style
4.1.3 areas of concern/difficulty (if applicable)
4.1.4 the use of tools and equipment
4.1.5 the relationship of the storyboard to the story told in the animation project
4.1.6 the quality of completed project
4.1.7 meeting school and community standards; e.g., appropriate language
4.2 participate in peer/teacher assessment
4.3 add the selected work to a portfolio
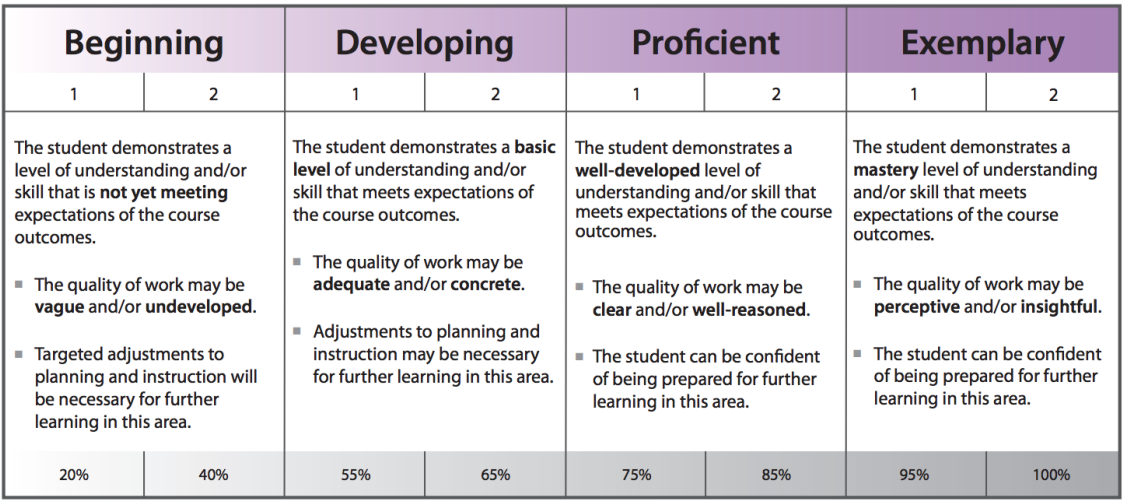
High School Assessment Rubric:
Assignment 1: More Tweens - Shape Tween, Classic Tween
We are going to continue on with our tweening by looking at the shape tween. Both will be important when dealing with rich media design later in the course..
|
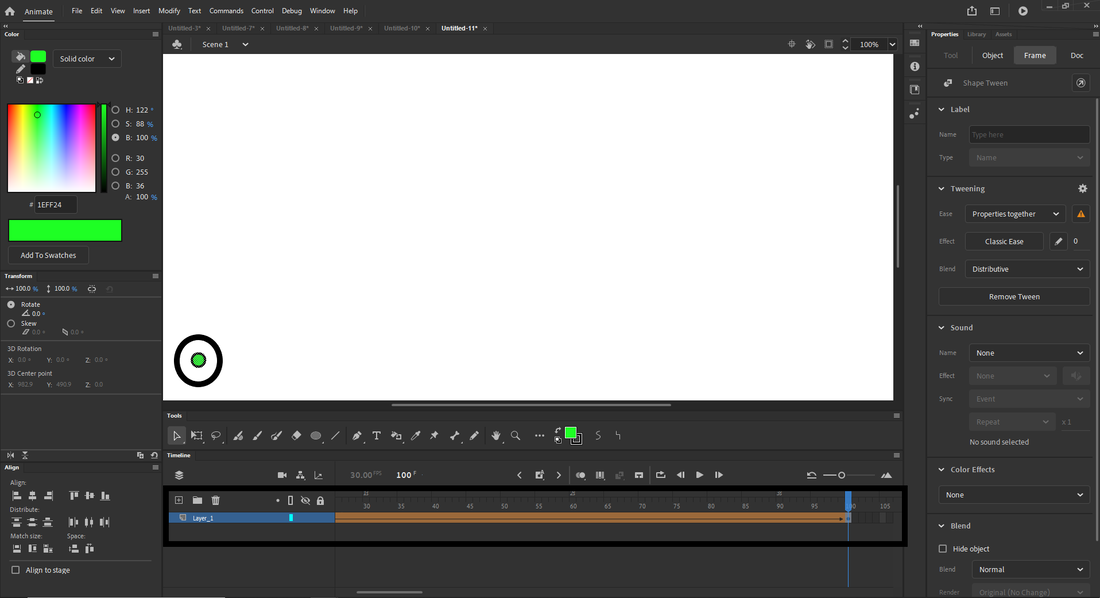
Lets start with a small ball of one colour. Hold shift to keep it fairly round. Right click on it and create a shape tween. The timeline will populate to 30, but you can drag it for as many frames as you like. Im going to drag out to 100.
|
|
|
2. Next lets delete the ball in the last frame and replace it with a rectangle in a different colour on another place on the canvas. We should now have this.
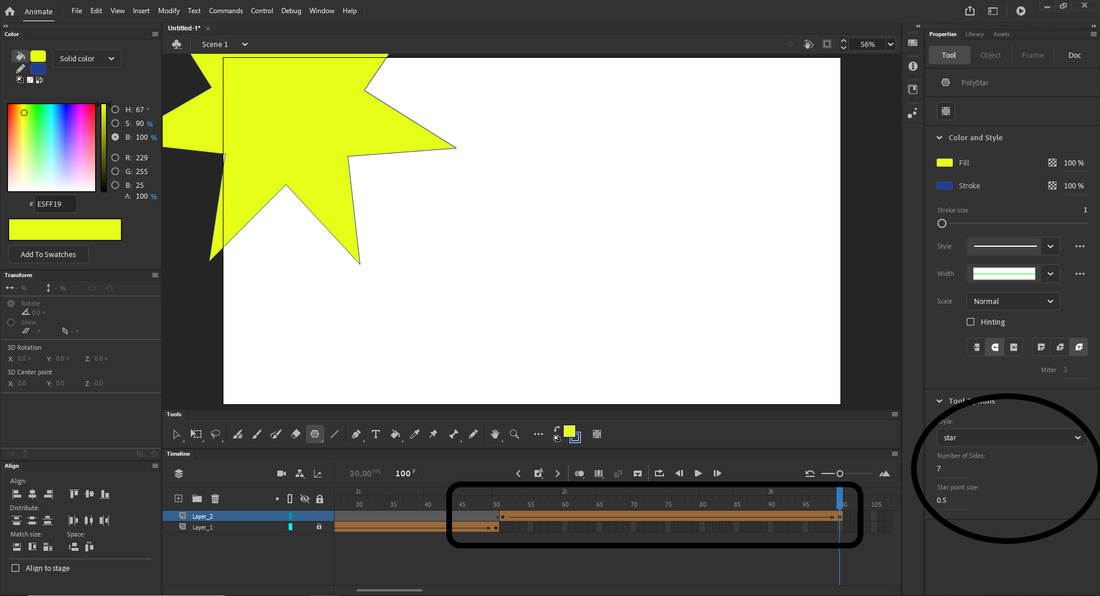
3. We are now going to insert another shape tween. Cause I like transitions. Add a layer. Add a blank keyframe at frame 51. Copy paste the red square from frame 50 on layer one to frame 51 on layer 2. (CTRL + Shift + V pastes it in exact place). Now right click and add another shape tween. This time I had to go to frame 100 and create a blank keyframe after the keyframe with the shape tween in it. I used the Polygon tool and turned it into a star using the properties on my right.
We should have this now:
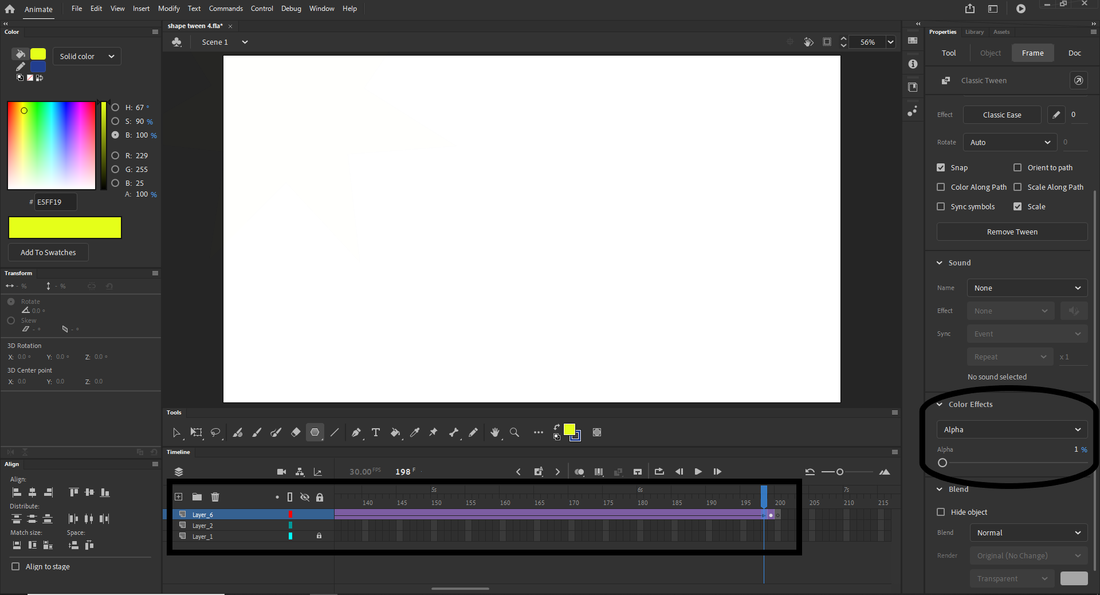
4. Now we are going to use a classic tween to move it and make it slowly fade from sight. Lets insert a new layer some more blank keyframes at 101. Lets make frames 102 to 200 a blank keyframe. This should leave us with a keyframe on 101 that is blank to 200.
On frame 101 lets insert a classic tween. At this point animate will ask to convert it to a symbol (shape tweens dont need to be symbols, wild hey?) click, okay. Now go to frame 200 and click the drop down under colour effects. Choose alpha and slide the slider to 0. This will make the shape slowly disappear throughout the tween. Here is what we have now:
5. Throw one last tween in for good measure and hand in your results. You now know all the tweens. |


|
Tweens part 2: The Camera
Assignment 2: Parenting
Parenting and Rigging are important for animations that are going to involve complex characters. I am going to show how to animate with a very rudimentary figure. We will also start to use symbols quite a bit more. Animation as you know it is slow, but at this point we are trying to speed up the process with tricks and competency.
Background Knowledge: this article explains in depth the difference between a registration point and a transformation point. Both you will need to know to make parenting and character rigging work. The next tutorials will be useless to you unless you know how to use both registration and transformation points.
https://flash-powertools.com/understanding-symbol-registration/
Synopsis of the article: Registration Point is visible both inside and outside of the symbol and is a property of the symbol itself and not the instance. (Think of it as something inside the symbol, while the Transformation point is on the outside.) It is permanent and cannot be moved. The Registration Point looks like a little black cross. (This distinction is very important going forward in Animate)
|
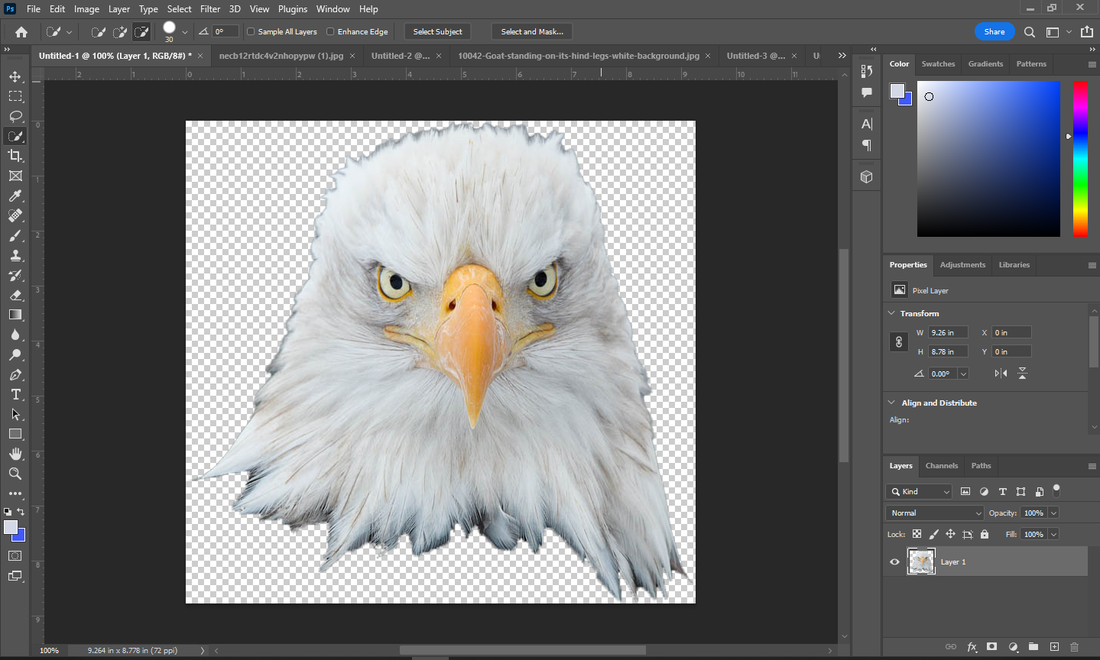
1. For my tutorial, I am going to bring in some assets from photoshop because im not a very good artist. I grabbed an eagle head, magic select tool'd it and then CTRL+C and CTRL+V'd it onto a new photophop artboard, deleted the background layer so it would be transparent and then exported it as a png.
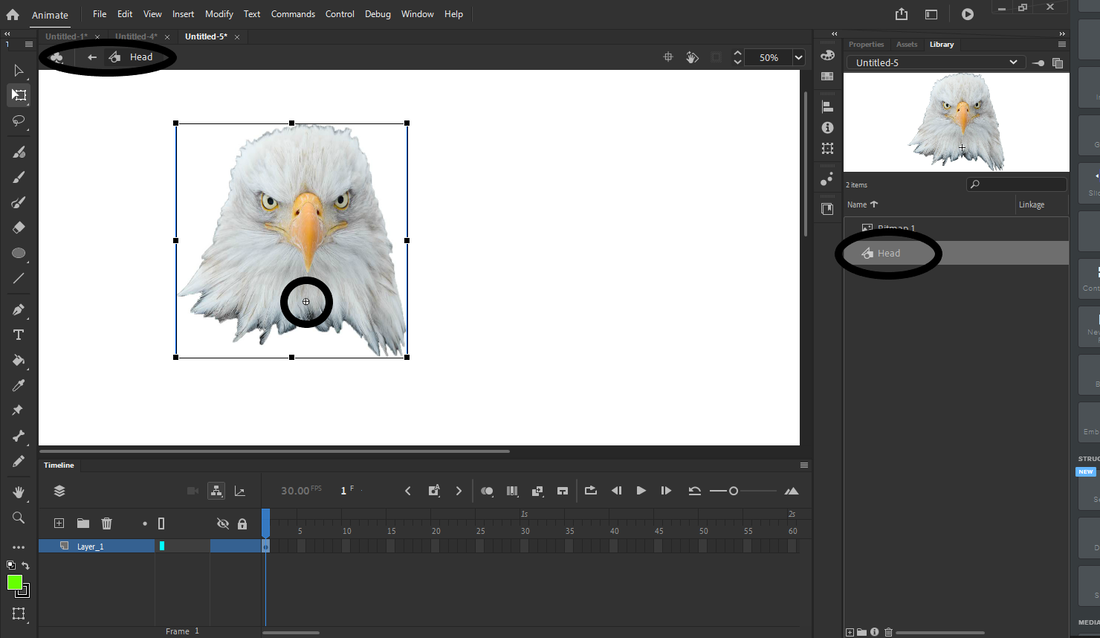
2. Here we go. Lets create the symbols we need for our rigging. When we create these symbols we are going to need to pay attention to where the cross is on the symbol page. This will act as the registration point. The transformation point will always snap back to the registration point and this is very important for rigging. CTRL+F8 will give us a "new symbol". Choose graphic and name it what body part you are going to draw in your character.
I want you to notice where the cross is, I free transformed the eagle head and moved it so that the transformation and registration point were where I wanted them. 3. I have gone ahead and made a bunch of my symbols in photoshop and imported them into symbols in animate and then made the layers so we can begin layer parenting and figure out how this works. When you are crafting your symbols and laying your transformation points, pay attention to where you will want them to pivot from.
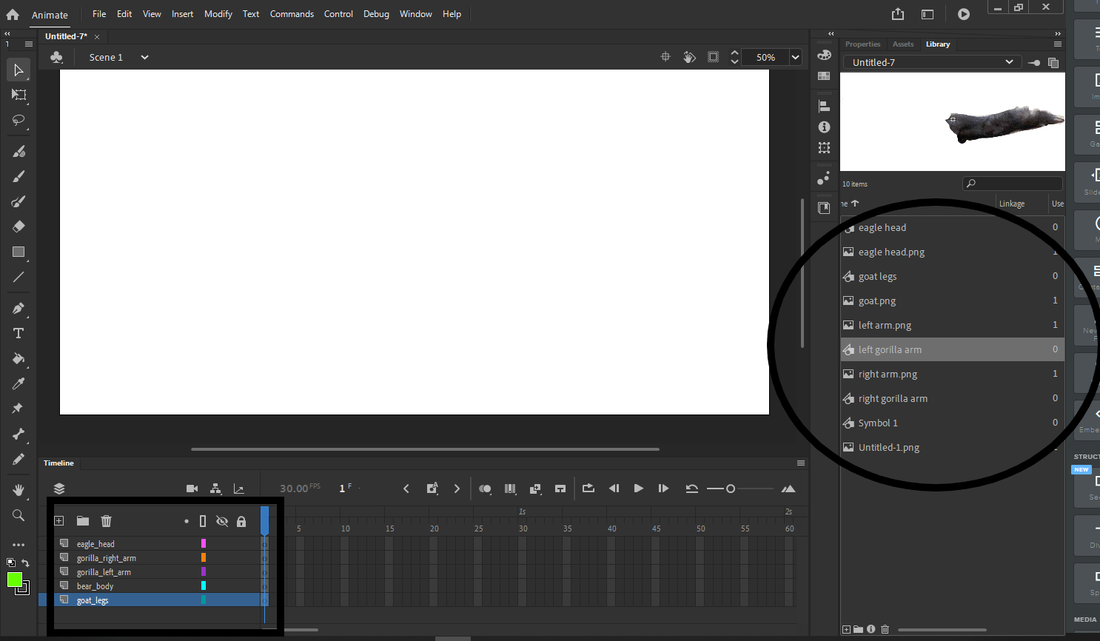
4. Now I am going to drag all of my symbols into my artboard on to the appropriate layer. Remember to grab the symbol, not the source file. But leave the source file there otherwise it'll delete your symbol. Then I am going to parent everything to the body by opening the layer parenting button and dragging the rectangles to the layer rectangle I want. Horrifying.
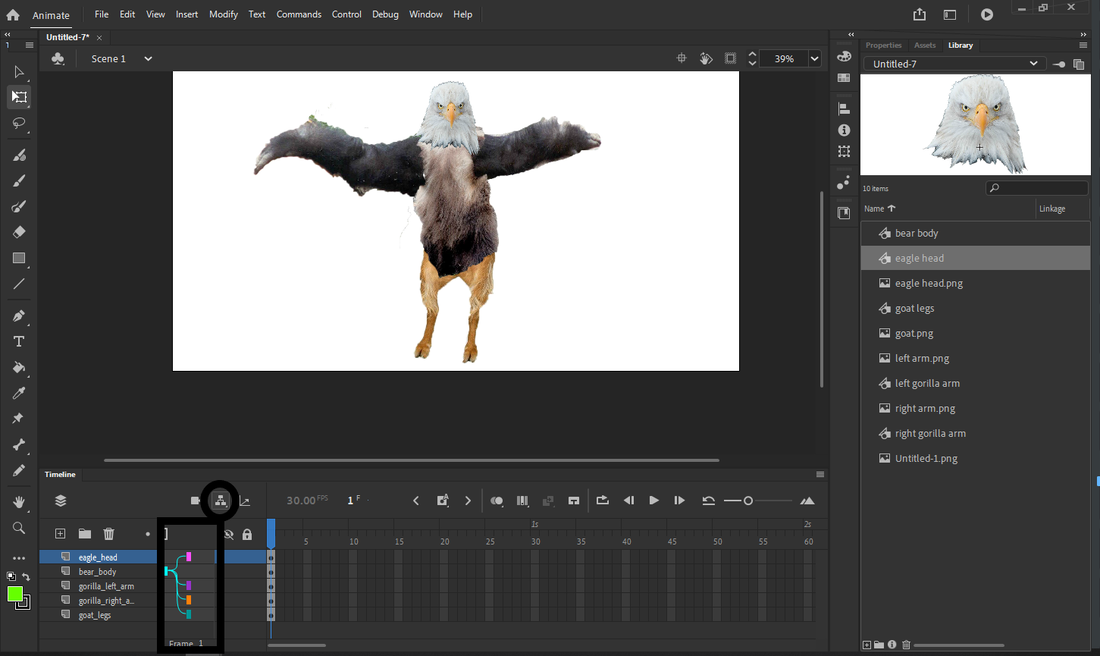
Once I parent my creature, I can now start to transform it from the parent alone. Move it around and transform from the body layer.
|
|
|
5. Now I will need some frames to work and animate my creature. The rest is simple and you should be able to take it from here with the tutorials provided. Make your creature, character, move through the world. Experiment with some things. Copy some frames. F6 is your friend. Make things big and small, back and forth etc.
If you do the work parenting, working with assets and base drawings makes it much easier to animate quicker. |

|
Here are a couple more tutorials that are easy to follow once you understand the transformation and registration points.
https://www.youtube.com/watch?v=co_A6wQVxGE&ab_channel=AdobeAnimate
Other Tutorial:
https://www.youtube.com/watch?v=_o4O_A5WGVc&ab_channel=ChrisGeorgenes
Other Tutorial:
https://www.youtube.com/watch?v=_o4O_A5WGVc&ab_channel=ChrisGeorgenes
Assignment 3: Puppetry - Rigging/ Bone Tool
|
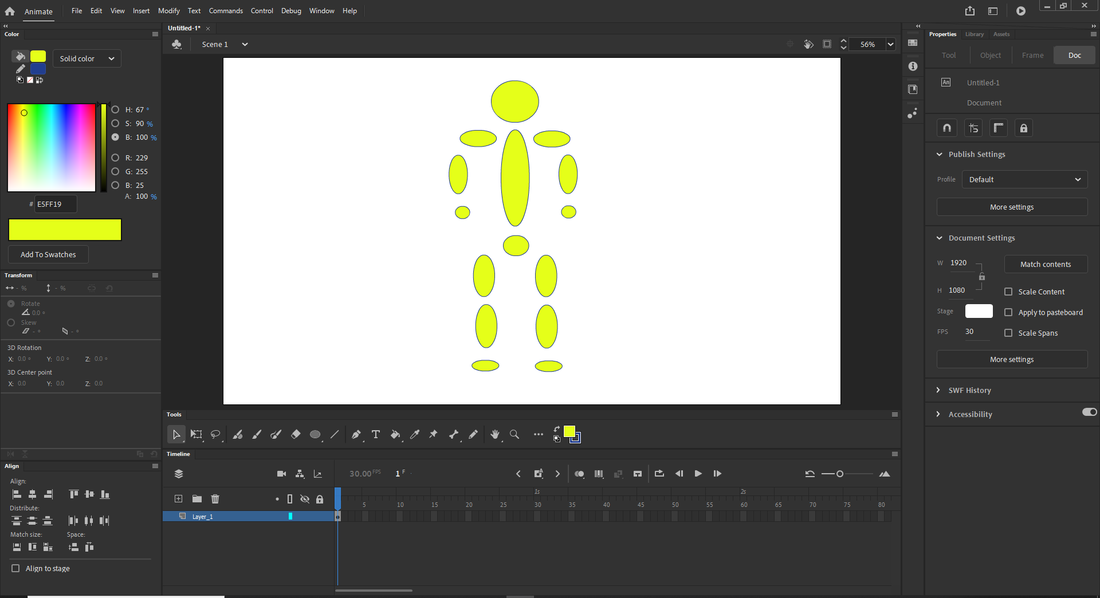
1. Start by making a puppet using ovals. Make as many "bones" as you would like to manipulate. I found the puppet shown works has a pretty good number of bones. If you hold the shift key, it keeps your shapes square. As a note, this is just a practice puppet. In the future, you would use pre-drawn character shapes.
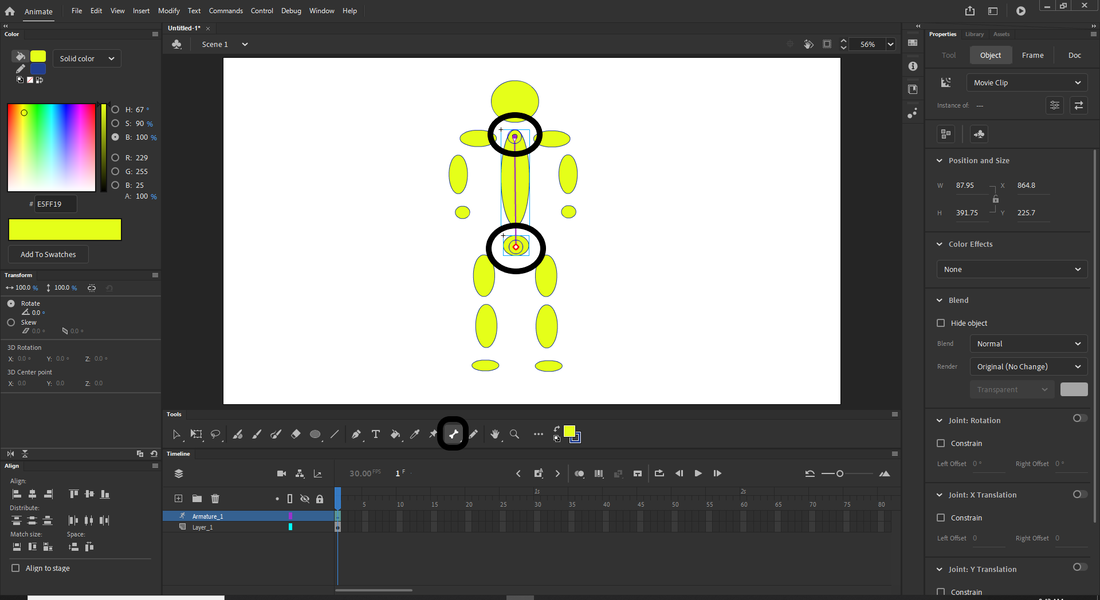
2. Once we have our shapes drawn we can use the bone tool, to start making our armatures. You want to make sure you begin at what will be the central joint of your puppet. Click and drag the bones out to where you want them. Please note that there can only be one pivot point per shape, so release where you want the bone to pivot on the shape, as well as where you want other bones to extrude from.
3. Click and drag from the center spots on the bones to keep adding more bones. At this point I should have a fairly working puppet I can move and play with.
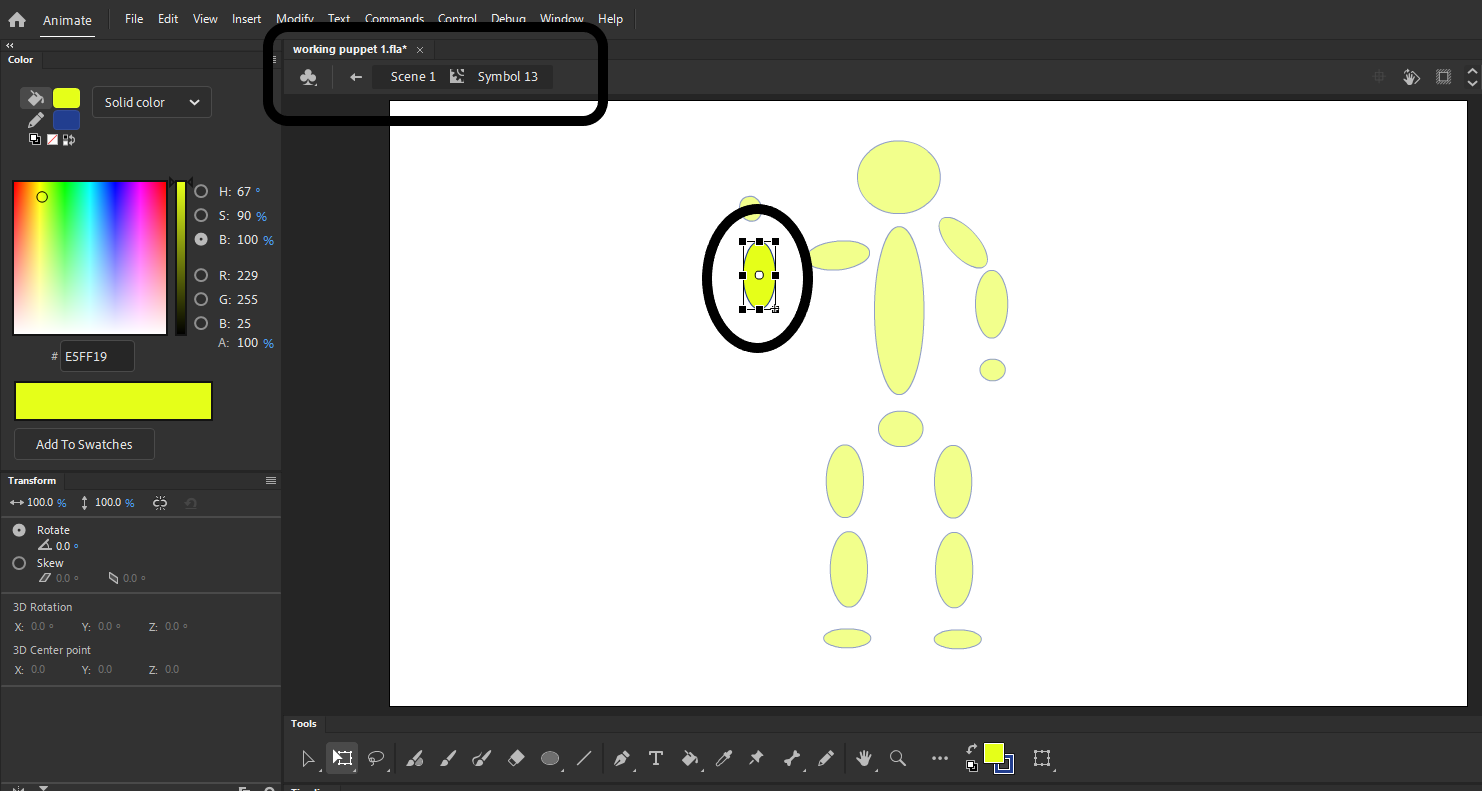
4. You are going to notice that the shoulder/bicep isnt quite correct and we are going to need to use the transform tool to correct it. At this point you can use the free transform tool to double click and adjust your puppet so it looks more natural. If you double click the shape and transform it however, it might dislocate the bone. You will need to move the registration point back to where you want the bone to connect on the shape. Make your puppet how you like it, see how it moves because the next step is animation.
5. Down in the timeline you are going to make a blank keyframe out to 50 or 100, depending on how ambitious you are. It should be a green line at this point. You can now move each armature as you wish, advance the frame, move the armature, advance the frame. The shortcut to advance one frame forward is the period on the keyboard "."
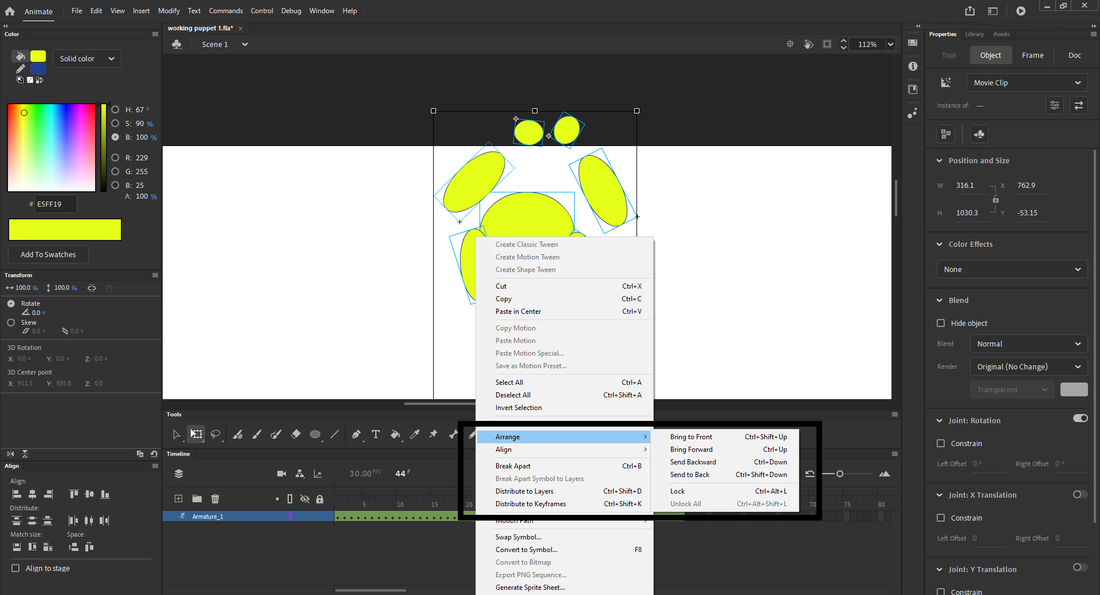
Ive got my character doing a quick ymca. It needs to be slowed down and you can see that the hand goes behind the torso. 6. A couple of things. Because everything is on one layer, youre are going to have to use a menu called arrange. This is how you will bring your bones to the front or the back of the canvas. Highly recommend learning and using the shortcuts for this function as you could be using it a lot once you start to get the hang of rigging.
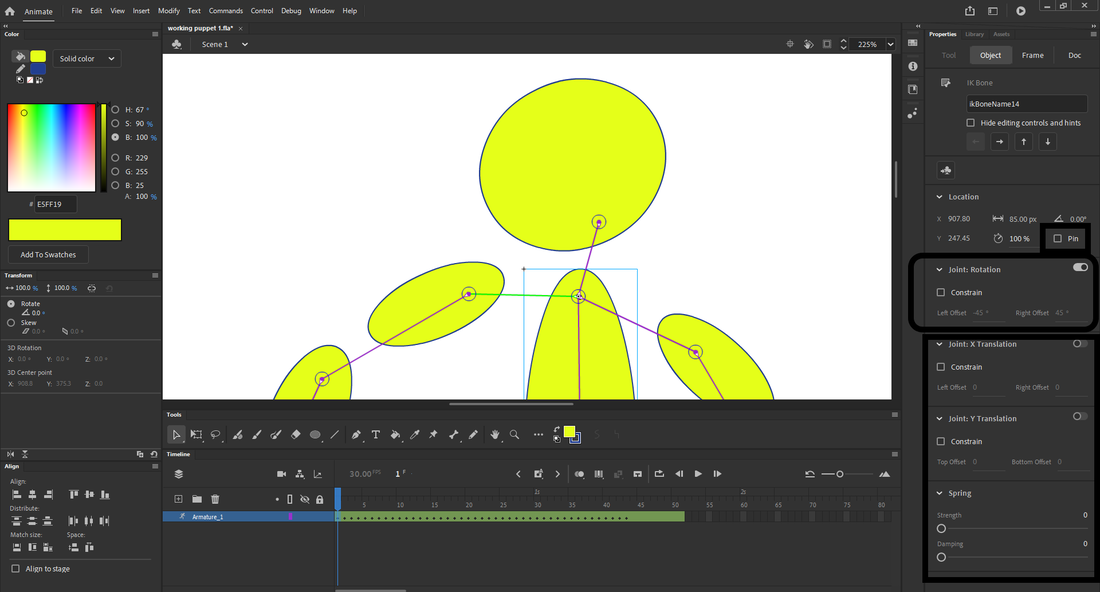
7. Lastly, you can start to constrain and join joints through the properties menu. Say you dont want the head to move more than 45 degrees on its axis. You would constrain the joint rotation. The properties toolbar is the key to getting you puppet to move correctly and naturally.
You can also pin bones in place by clicking in the center. This holds the bone/symbol in place. Using the bone tool and modern rigging is very in depth, and I wont go into it in the tutorial. Here is a very in depth look at the tool: https://helpx.adobe.com/ca/animate/using/bone-tool-animation.html |

|
Your task is to create a 10 second stick figure using the bone tool. You can make your stick figure walk, dance, the YMCA etc.
Here is a video tutorial of a guy that shows you how to take the bone tool to the next level.
https://www.youtube.com/watch?v=v84zAJi704k&ab_channel=WhatMakeArt
Here is a video tutorial of a guy that shows you how to take the bone tool to the next level.
https://www.youtube.com/watch?v=v84zAJi704k&ab_channel=WhatMakeArt
Assignment 4: Techniques of Animation
Holy smokes you should have a real good grasp of animation after the 10 and 20 level. Now I want you to know and understand how we actually bring things to life in an animated world. That means understanding and animating one of the twelve principles of animation.
Step 1: Watch the video explaining in greater detail what the 12 principles are. It can also be found here:
https://www.youtube.com/watch?v=gyGEwyWLbHk
Step 2: Pick 1 of these principles and demonstrate with a simple animation of your creating. For example, if you want to attempt the “Squash and Stretch”, you might animate a ball falling and squashing when it hits the floor. Add any details that might improve the look and feel of your animation, but remember that the focus of this assignment is to show the principles in action. Degree of difficulty will be taken into account when being graded. i.e. if you choose the squash and stretch, it had better be amazing to get an 80%.
Below are the descriptions and a student made example of animation.
Techniques of Animation
12 Principles of Animation
The following 12 basic principles of animation were developed by the 'old men' of Walt Disney Studios, amongst them Frank Thomas and Ollie Johnston, during the 1930s. Of course they weren't old men at the time, but young men who were at the forefront of exciting discoveries that were contributing to the development of a new art form. These principles are not the only way to make an effective animation, but they capture most of the techniques an animator will use to best tell their story. Even though they were animating back in the 1930’s, these principles are still fundamental to the newest 3D animated movies. If you want to be a good animator, these principles are the best place to start practicing.
Here is an excellent video which shows each principle with examples for those of you who hate to read.
https://www.youtube.com/watch?v=uDqjIdI4bF4
1. SQUASH AND STRETCH
This action gives the illusion of weight and volume to a character as it moves. Also squash and stretch is useful in animating dialogue and doing facial expressions. How extreme the use of squash and stretch is, depends on what is required in animating the scene. Usually it's broader in a short style of picture and subtler in a feature. It is used in all forms of character animation from a bouncing ball to the body weight of a person walking. This is the most important element you will be required to master and will be used often.
Credit: Elvis Nguyen
2. ANTICIPATION
This movement prepares the audience for a major action the character is about to perform, such as, starting to run, jump or change expression. A dancer does not just leap off the floor. A backwards motion occurs before the forward action is executed. The backward motion is the anticipation. A comic effect can be done by not using anticipation after a series of gags that used anticipation. Almost all real action has major or minor anticipation such as a pitcher's wind-up or a golfers' back swing. Feature animation is often less broad than short animation unless a scene requires it to develop a characters personality.
This movement prepares the audience for a major action the character is about to perform, such as, starting to run, jump or change expression. A dancer does not just leap off the floor. A backwards motion occurs before the forward action is executed. The backward motion is the anticipation. A comic effect can be done by not using anticipation after a series of gags that used anticipation. Almost all real action has major or minor anticipation such as a pitcher's wind-up or a golfers' back swing. Feature animation is often less broad than short animation unless a scene requires it to develop a characters personality.

Credit: Livia Suppes
3. STAGING
A pose or action should clearly communicate to the audience the attitude, mood, reaction or idea of the character as it relates to the story and continuity of the story line. The effective use of long, medium, or close up shots, as well as camera angles also helps in telling the story. There is a limited amount of time in a film, so each sequence, scene and frame of film must relate to the overall story. Do not confuse the audience with too many actions at once. Use one action clearly stated to get the idea across, unless you are animating a scene that is to depict clutter and confusion. Staging directs the audience's attention to the story or idea being told. Care must be taken in background design so it isn't obscuring the animation or competing with it due to excess detail behind the animation. Background and animation should work together as a pictorial unit in a scene.
4. STRAIGHT AHEAD AND POSE TO POSE ANIMATION
Straight ahead animation starts at the first drawing and works drawing to drawing to the end of a scene. You can lose size, volume, and proportions with this method, but it does have spontaneity and freshness. Fast, wild action scenes are done this way. Pose to Pose is more planned out and charted with key drawings done at intervals throughout the scene. Size, volumes, and proportions are controlled better this way, as is the action. The lead animator will turn charting and keys over to his assistant. An assistant can be better used with this method so that the animator doesn't have to draw every drawing in a scene. An animator can do more scenes this way and concentrate on the planning of the animation. Many scenes use a bit of both methods of animation.
5. FOLLOW THROUGH AND OVERLAPPING ACTION
When the main body of the character stops all other parts continue to catch up to the main mass of the character, such as arms, long hair, clothing, coat tails or a dress, floppy ears or a long tail (these follow the path of action). Nothing stops all at once. This is follow through. Overlapping action is when the character changes direction while his clothes or hair continues forward. The character is going in a new direction, to be followed, a number of frames later, by his clothes in the new direction. "DRAG," in animation, for example, would be when Goofy starts to run, but his head, ears, upper body, and clothes do not keep up with his legs. In features, this type of action is done more subtly. Example: When Snow White starts to dance, her dress does not begin to move with her immediately but catches up a few frames later. Long hair and animal tail will also be handled in the same manner. Timing becomes critical to the effectiveness of drag and the overlapping action.
6. SLOW-OUT AND SLOW-IN
As action starts, we have more drawings near the starting pose, one or two in the middle, and more drawings near the next pose. Fewer drawings make the action faster and more drawings make the action slower. Slow-ins and slow-outs soften the action, making it more life-like. For a gag action, we may omit some slow-out or slow-ins for shock appeal or the surprise element. This will give more snap to the scene.

7. ARCS
All actions, with few exceptions (such as the animation of a mechanical device), follow an arc or slightly circular path. This is especially true of the human figure and the action of animals. Arcs give animation a more natural action and better flow. Think of natural movements in the terms of a pendulum swinging. All arm movement, head turns and even eye movements are executed on an arcs.
Credit: Elvis Nguyen
8. SECONDARY ACTION
This action adds to and enriches the main action and adds more dimension to the character animation, supplementing and/or re-enforcing the main action. Example: A character is angrily walking toward another character. The walk is forceful, aggressive, and forward leaning. The leg action is just short of a stomping walk. The secondary action is a few strong gestures of the arms working with the walk. Also, the possibility of dialogue being delivered at the same time with tilts and turns of the head to accentuate the walk and dialogue, but not so much as to distract from the walk action. All of these actions should work together in support of one another. Think of the walk as the primary action and arm swings, head bounce and all other actions of the body as secondary or supporting action.
9. TIMING
Expertise in timing comes best with experience and personal experimentation, using the trial and error method in refining technique. The basics are: more drawings between poses slow and smooth the action. Fewer drawings make the action faster and crisper. A variety of slow and fast timing within a scene adds texture and interest to the movement. Most animation is done on twos (one drawing photographed on two frames of film) or on ones (one drawing photographed on each frame of film). Twos are used most of the time, and ones are used during camera moves such as trucks, pans and occasionally for subtle and quick dialogue animation. Also, there is timing in the acting of a character to establish mood, emotion, and reaction to another character or to a situation. Studying movement of actors and performers on stage and in films is useful when animating human or animal characters. This frame by frame examination of film footage will aid you in understanding timing for animation. This is a great way to learn from the others.
Credit: Elvis Nguyen
10. EXAGGERATION
Exaggeration is not extreme distortion of a drawing or extremely broad, violent action all the time. Its like a caricature of facial features, expressions, poses, attitudes and actions. Action traced from live action film can be accurate, but stiff and mechanical. In feature animation, a character must move more broadly to look natural. The same is true of facial expressions, but the action should not be as broad as in a short cartoon style. Exaggeration in a walk or an eye movement or even a head turn will give your film more appeal. Use good taste and common sense to keep from becoming too theatrical and excessively animated.
11. SOLID DRAWING
The basic principles of drawing form, weight, volume solidity and the illusion of three dimension apply to animation as it does to academic drawing. The way you draw cartoons, you draw in the classical sense, using pencil sketches and drawings for reproduction of life. You transform these into color and movement giving the characters the illusion of three-and four-dimensional life. Three dimensional is movement in space. The fourth dimension is movement in time.
12. APPEAL
A live performer has charisma. An animated character has appeal. Appealing animation does not mean just being cute and cuddly. All characters have to have appeal whether they are heroic, villainous, comic or cute. Appeal, as you will use it, includes an easy to read design, clear drawing, and personality development that will capture and involve the audience's interest. Early cartoons were basically a series of gags strung together on a main theme. Over the years, the artists have learned that to produce a feature there was a need for story continuity, character development and a higher quality of artwork throughout the entire production. Like all forms of storytelling, the feature has to appeal to the mind as well as to the eye.
Assignment 5: Free Animate
This is where you get marks for coming up with the weird and wacky stuff that is in your brain. No parameter. Make something cool.
Credit: Hossein Faraj
|
Credit: Livia Suppes
|
Assessment Rubric:
