Design 1020: The Design Process
Outcomes:
1. identify the steps in the design process
1.1 recognize and apply the components of the design process, including:
1.1.1 identifying the problem or need (design brief)
1.1.2 researching the problem
1.1.3 generating ideas and visualizing potential solutions
1.1.4 choosing the best solution
1.1.5 choosing the best method of presentation
1.1.6 making or modelling a solution
1.1.7 presenting the solution
1.1.8 evaluating the solution
1.2 identify the elements; e.g., line, shape (2-D) or form (3-D), colour, texture, depth (perspective), light, direction (motion), mass (visual weight), tone (black and white) or value (colour), space (positive and negative)
1.3 identify the principles of design, e.g., balance, emphasis, proportion (scale), repetition (rhythm/pattern), unity, contrast, harmony, proximity and variety, as they apply to form and function
2. apply the steps in the design process through production of a designed solution
2.1 follow the design process to create solutions for one or more 2-D or 3-D projects
2.2 select and use appropriate tools and materials as outlined in the design brief
2.3 effectively communicate intentions and decision making related to the design project; e.g., form, function, aesthetics
2.4 use and maintain tools and materials in a safe and appropriate manner
3. present a portfolio-ready drawing, rendering or model that the student produced
3.1 present sketches, drawings and/or models for assessment
3.2 maintain a design folder, journal or sketchbook as part of the portfolio of ongoing observational drawing and modelling activities
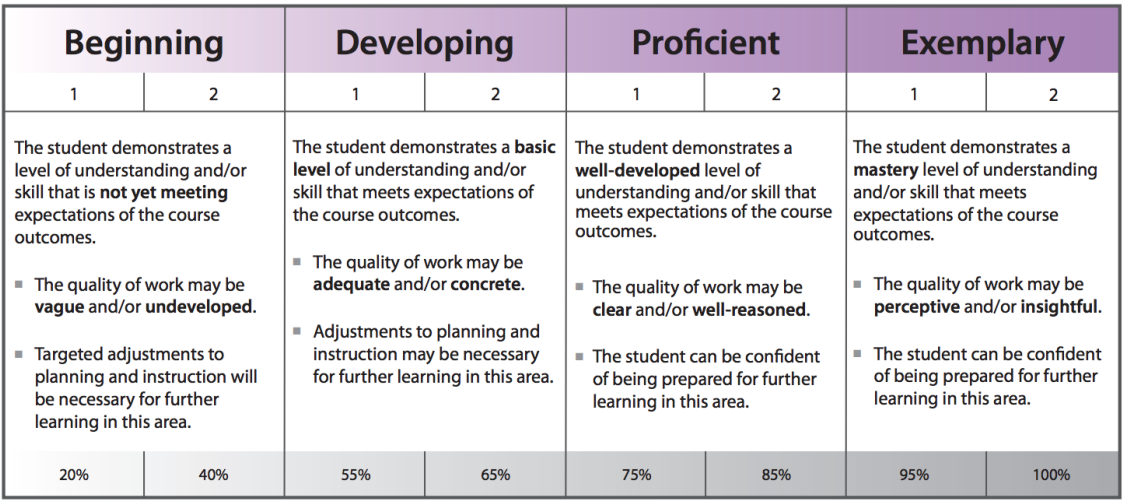
High School Assessment Rubric:
Assignment 1: TinkerCad
Most of the outcomes for this credit will come from your other credits. However, I would like you to have a basic grasp of how the design process works. You will achieve this by developing a unique 3d model illustrating the design process.
You will need to use Tinkercad to start your 3d modelling journey. You will need to create a free account with your educbe account.
Link: www.tinkercad.com
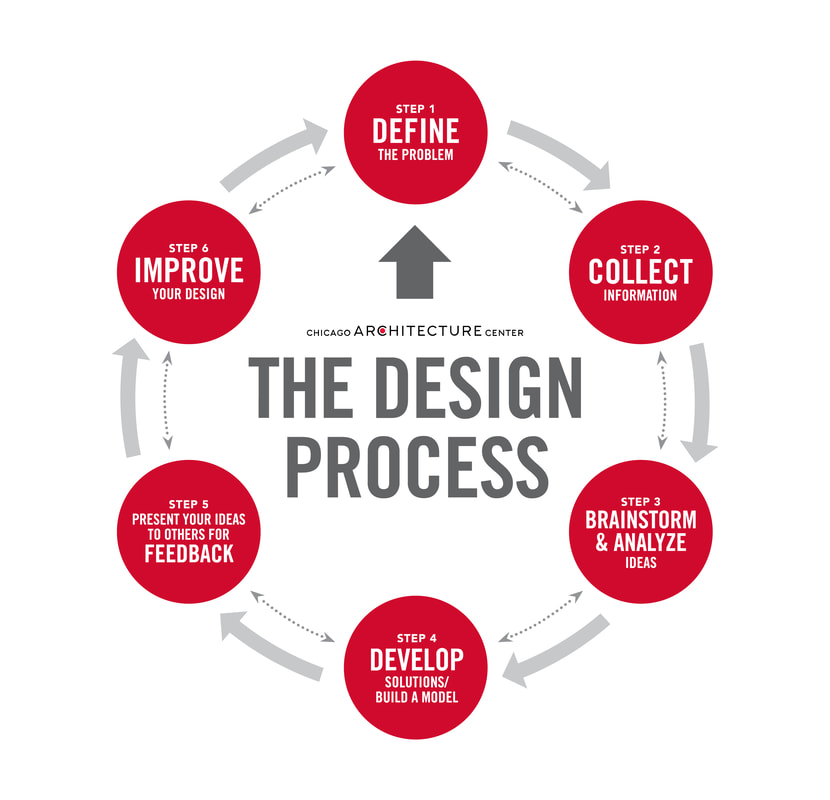
Here is the poster you are recreating in 3d:
You will need to use Tinkercad to start your 3d modelling journey. You will need to create a free account with your educbe account.
Link: www.tinkercad.com
Here is the poster you are recreating in 3d:
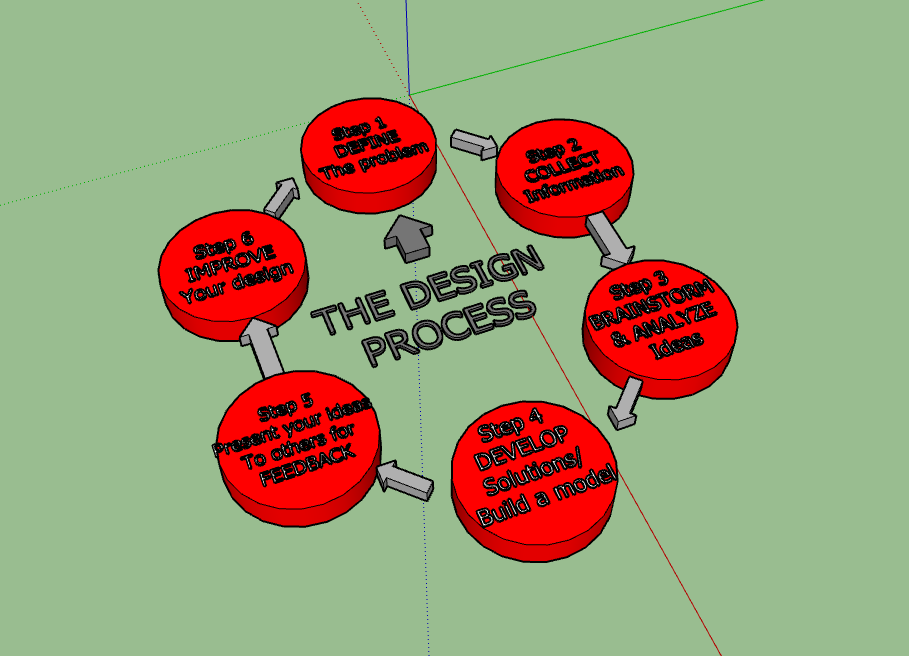
Here is a good example of how your design should look in sketchup.
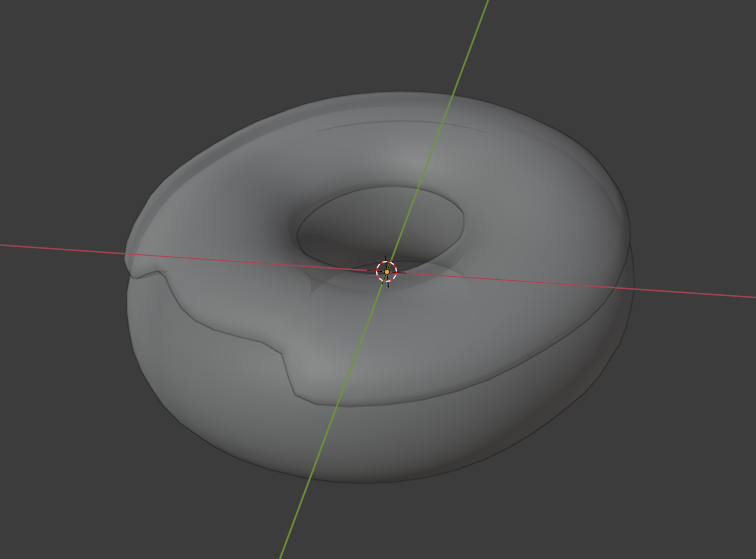
3D Design Intro: Model a Blender Donut
I made my donut on blender 2.8. So you may not have the exact donut at the end of the tutorials. I have since updated to blender 3.5 on the lab computers and and changed the tutorials so that they reflect the more recent versions. I have kept the old versions and labelled them for reference. Same guy runs the tutorials though, the blender guru. Give the guy some clicks. Here is his first tutorial that does not involve the donut but will introduce you to the program
intro tutorial to 4.0 : https://www.youtube.com/watch?v=B0J27sf9N1Y&list=PLjEaoINr3zgEPv5y--4MKpciLaoQYZB1Z&index=1&ab_channel=BlenderGuru
intro tutorial to 4.0 : https://www.youtube.com/watch?v=B0J27sf9N1Y&list=PLjEaoINr3zgEPv5y--4MKpciLaoQYZB1Z&index=1&ab_channel=BlenderGuru
Assignment 2: The Basic Donut4.0 www.youtube.com/watch?v=tBpnKTAc5Eo&list=PLjEaoINr3zgEPv5y--4MKpciLaoQYZB1Z&index=3&ab_channel=BlenderGuru
Beside is an example of what you should have after this video. Save as Assignment 1 Donut in your Design Process folder |

|
Assignment 3: Icing!
|
4.0 https://www.youtube.com/watch?v=AqJx5TJyhes&list=PLjEaoINr3zgEPv5y--4MKpciLaoQYZB1Z&index=3&ab_channel=BlenderGuru
Here is the tutorial to get your donut looking a little bit more donuty. Please save your donut at this phase into your Design Process folder and call it Assignment 2 |
|
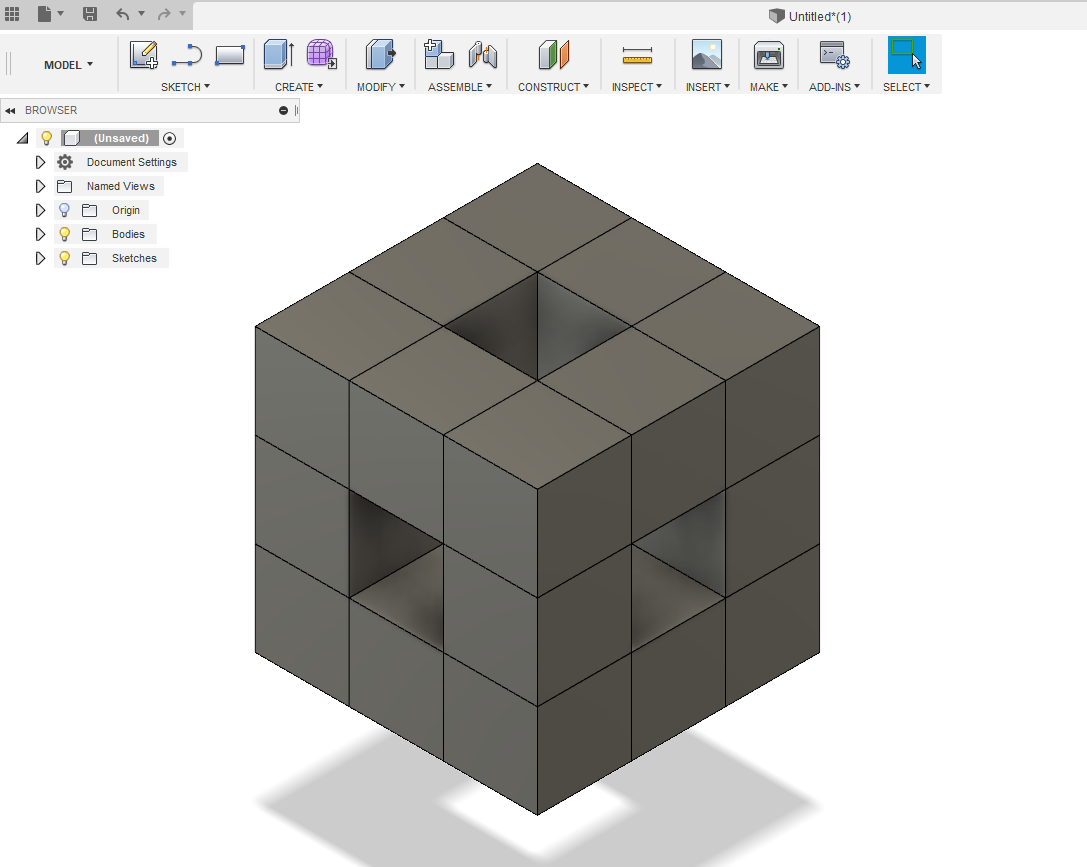
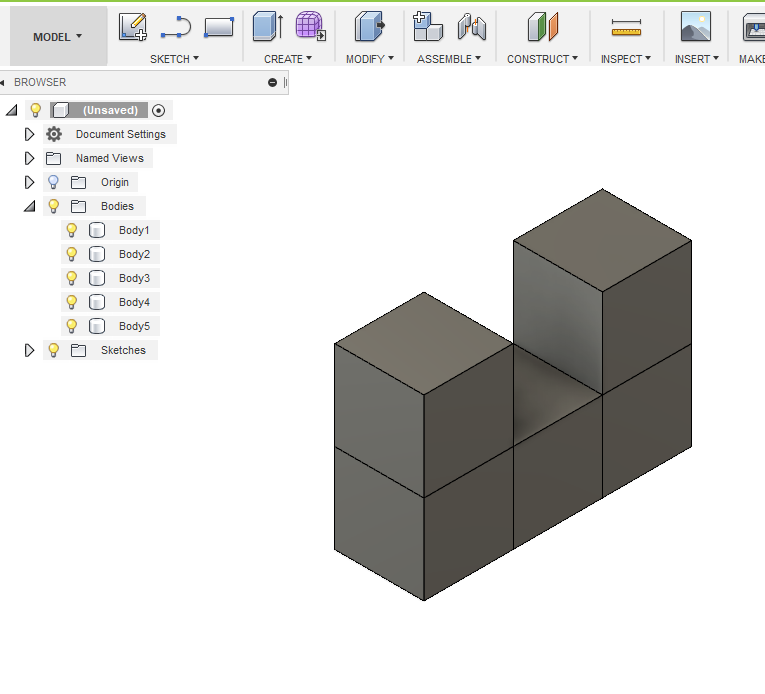
Assignment 4: CAD Intro: Fusion 360 Cube
|
Create a rubix cube out of squares. Remove all center pieces (or don't put them in at all.
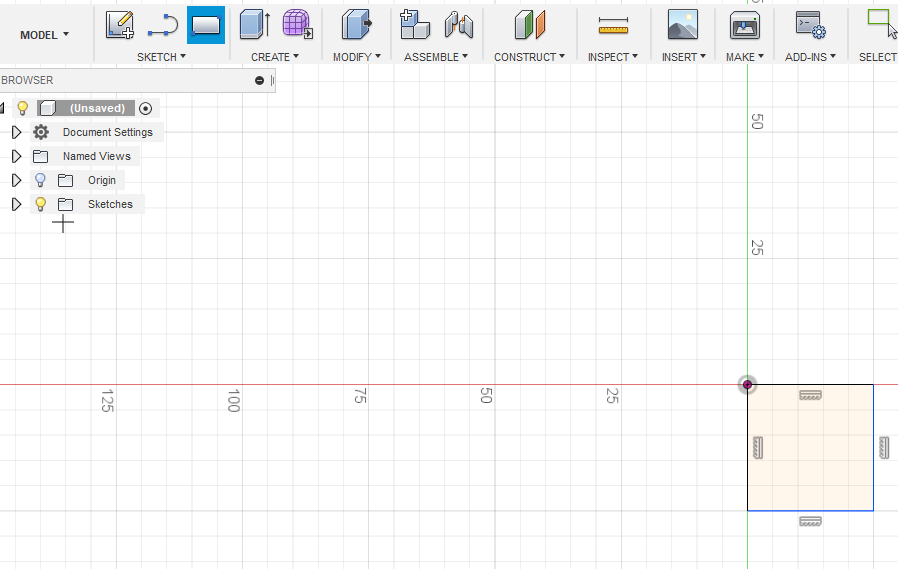
Tips: Moving around the environment is the key to fusion 360. There is a box in the top right hand corner that allows you to move the view. Pushing the scroll wheel on your mouse will allow you to move the view and holding shift with your mouse scroll wheel will allow you to pan. Step 1: Start with "create sketch" almost all 3d objects begin with a 2d blueprint. Use the 2 point rectangle command to create a square of any size.
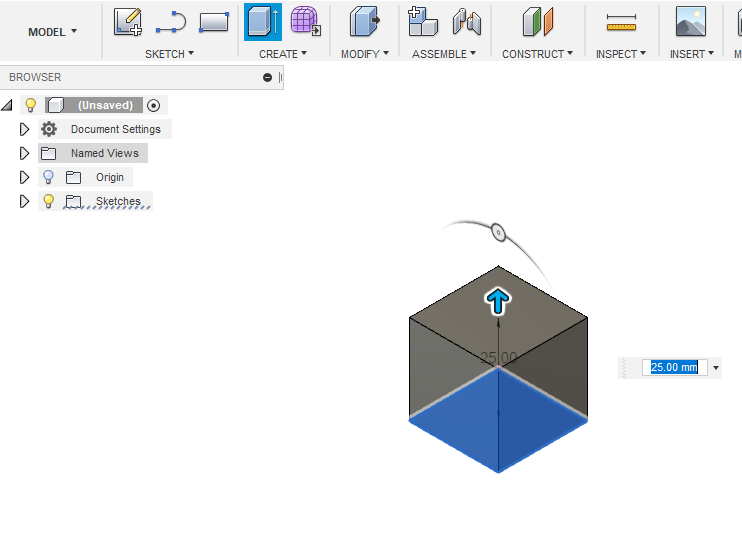
Step 2: Extrude the square to a cube using the create (extrude command)
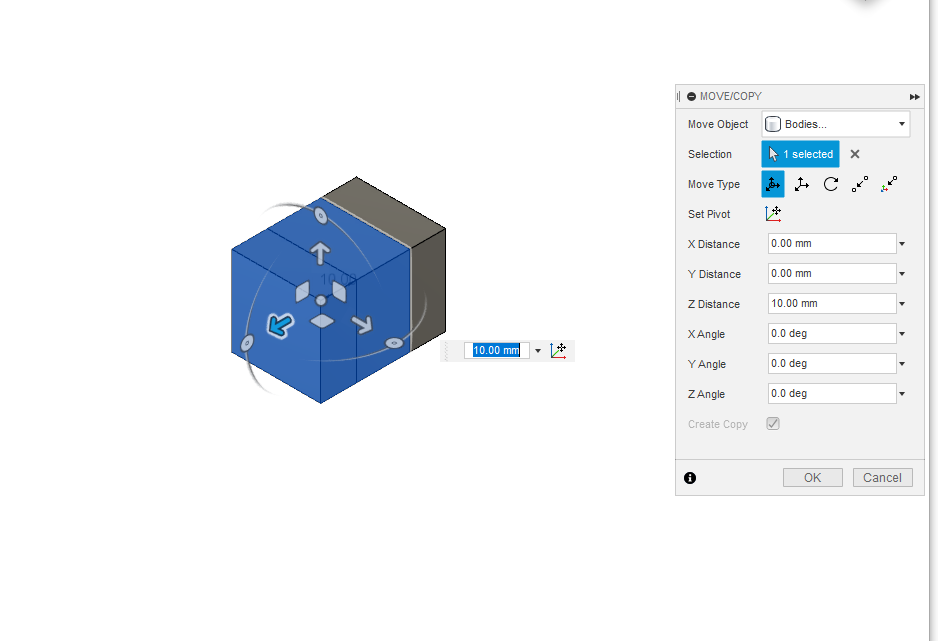
Step 3: select all faces of the cube (or use the bodies menu on the sidebar to select the cube and right click copy. Or (ctrl c). At this point a menu will come up at the side in which you will have to select create copy. click the box and move your copy off of your original copy
Step 4: copy and move your blocks into a formation that creates a hollow rubix cube as per the original diagram. Use the arrows to move your blocks.
When you are finished, use file>3d print to select your object (unclick send to meshmixer) to save to an stl and place in your fusion 360 folder (CAD 1). |
|
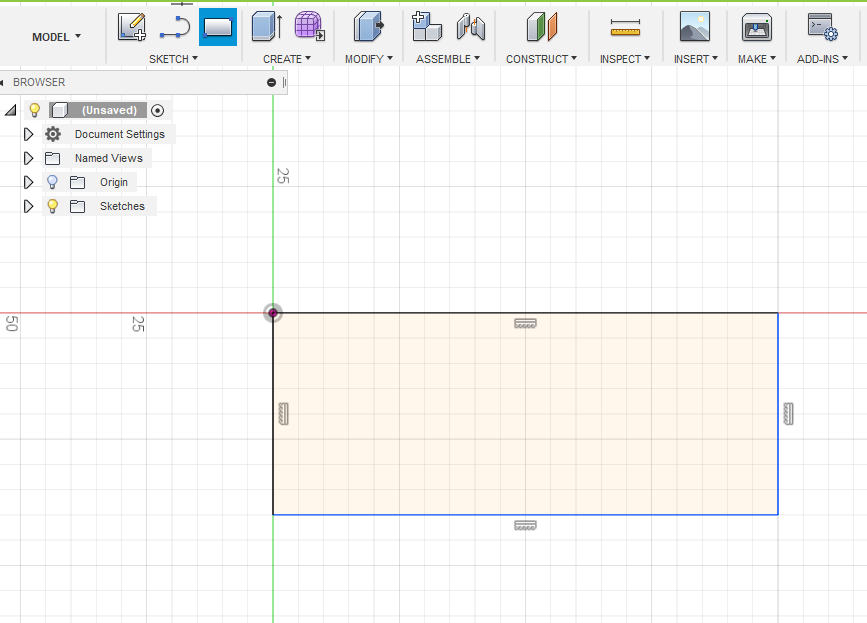
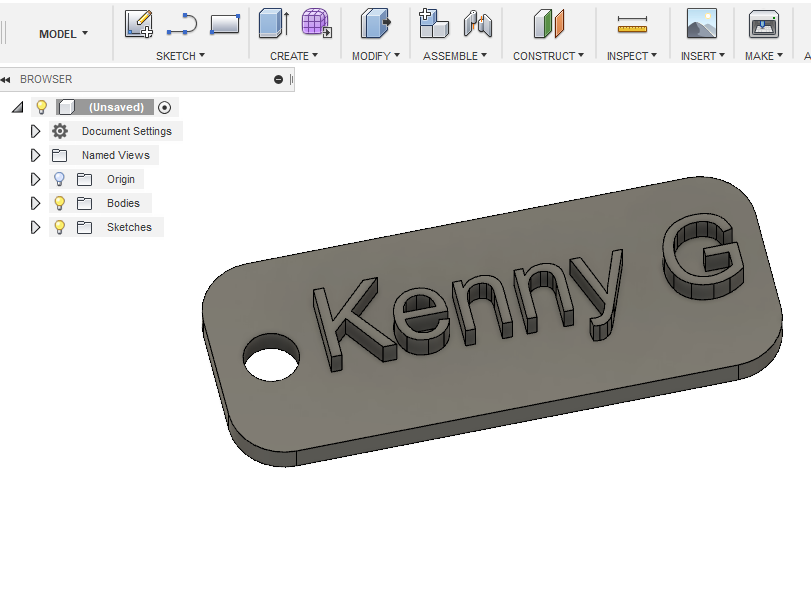
Assignment 5: CAD Intro: Fusion 360 Keychain
|
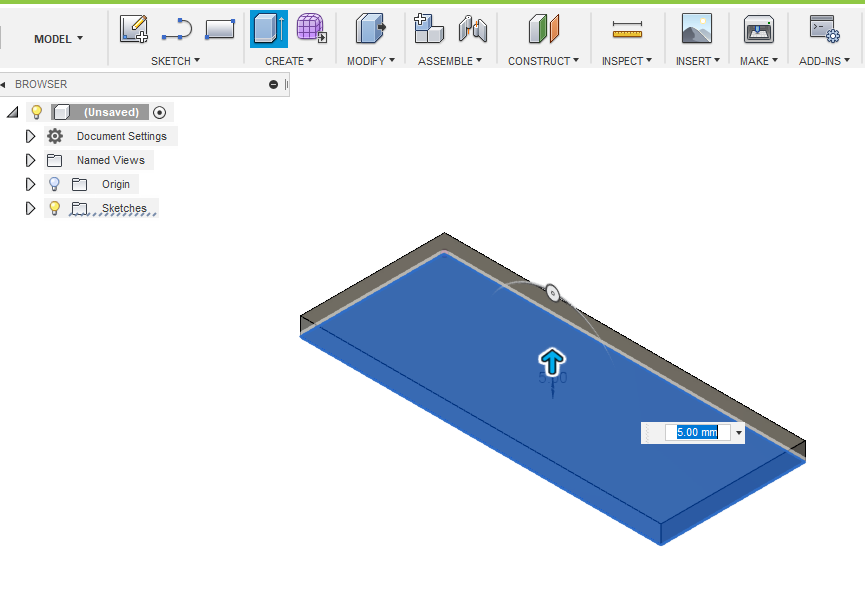
Step 1: Create a rectangle 100mm by 40mm. Step 2: Extrude by 5mm.
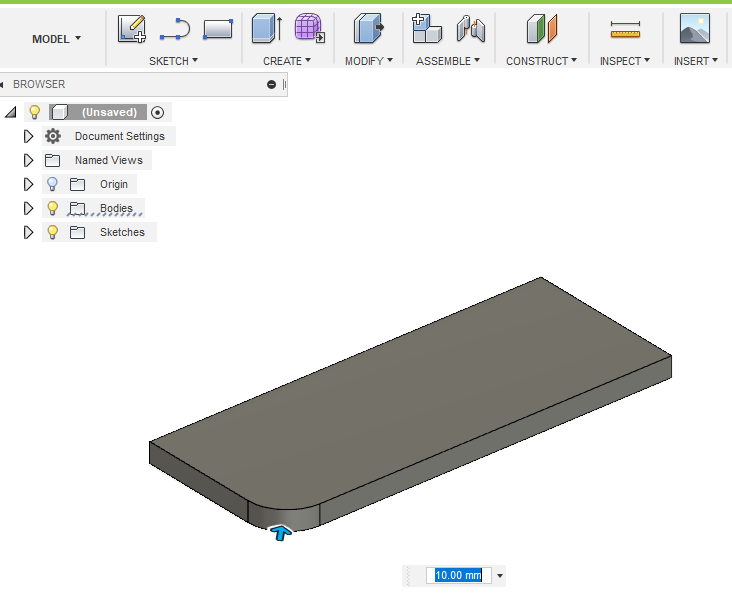
Step 3: Use the fillet tool under the modify menu to round the corners. Choose the corner line to round in, but maybe experiment with other lines. ctrl z is undo. Round all corners to 10mm.
Remember that there is always a menu to play around when we use these types of commands. Step 4: sketch a hole on the end of the keychain using a center diameter circle and extrude it through the keychain.(using a negative value)
Step 5: Use the text tool (under sketch) to write whatever you want on your keychain. Move your text and modify as needed.
Extrude your text by 3 mm. Step 6: Bonus, put a border on your keychain by putting another rectangle on the face
|

|
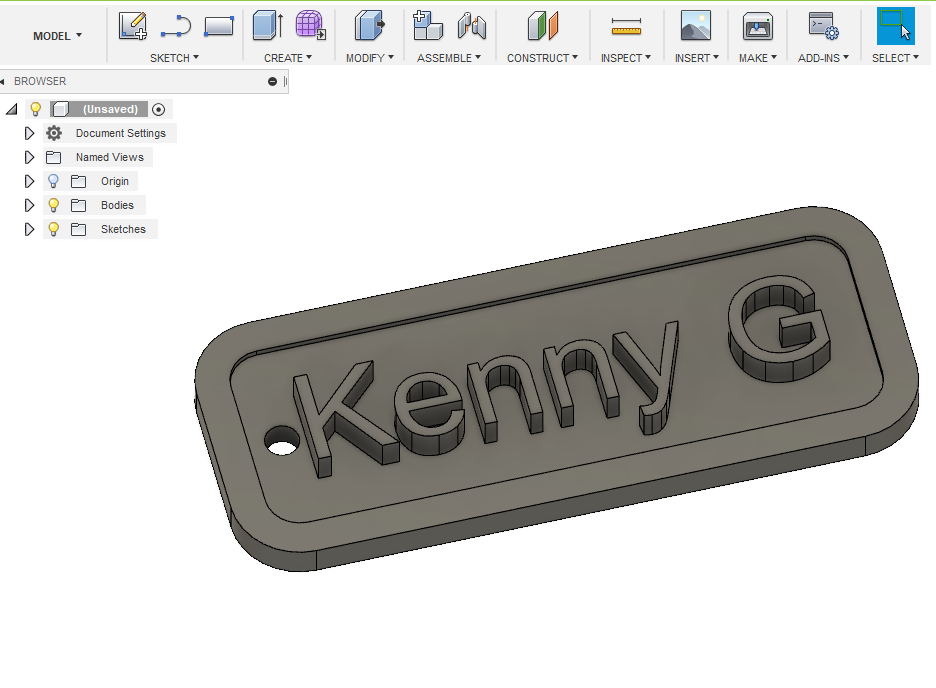
Step 6: Add your finishing touches. This may include painting the keychain or adding more features like rounding off edges. When finished Group everything together and export as STL.
Step 7: When finished save as STL. We are ready to print.
Step 8: Print your model. If it goes wrong go back to the drawing board. Improve your design and print again. If it goes as planned evaluate your model. Is there room for improvements? (You only get two prints so make sure you have made sufficient modifications before trying again).
For an added challenge, try to hollow out your letters. (inset)
When you are finished, use the make command on the toolbar to save to an stl and place in your fusion 360 folder. Make sure you uncheck the send to meshmixer box.
